

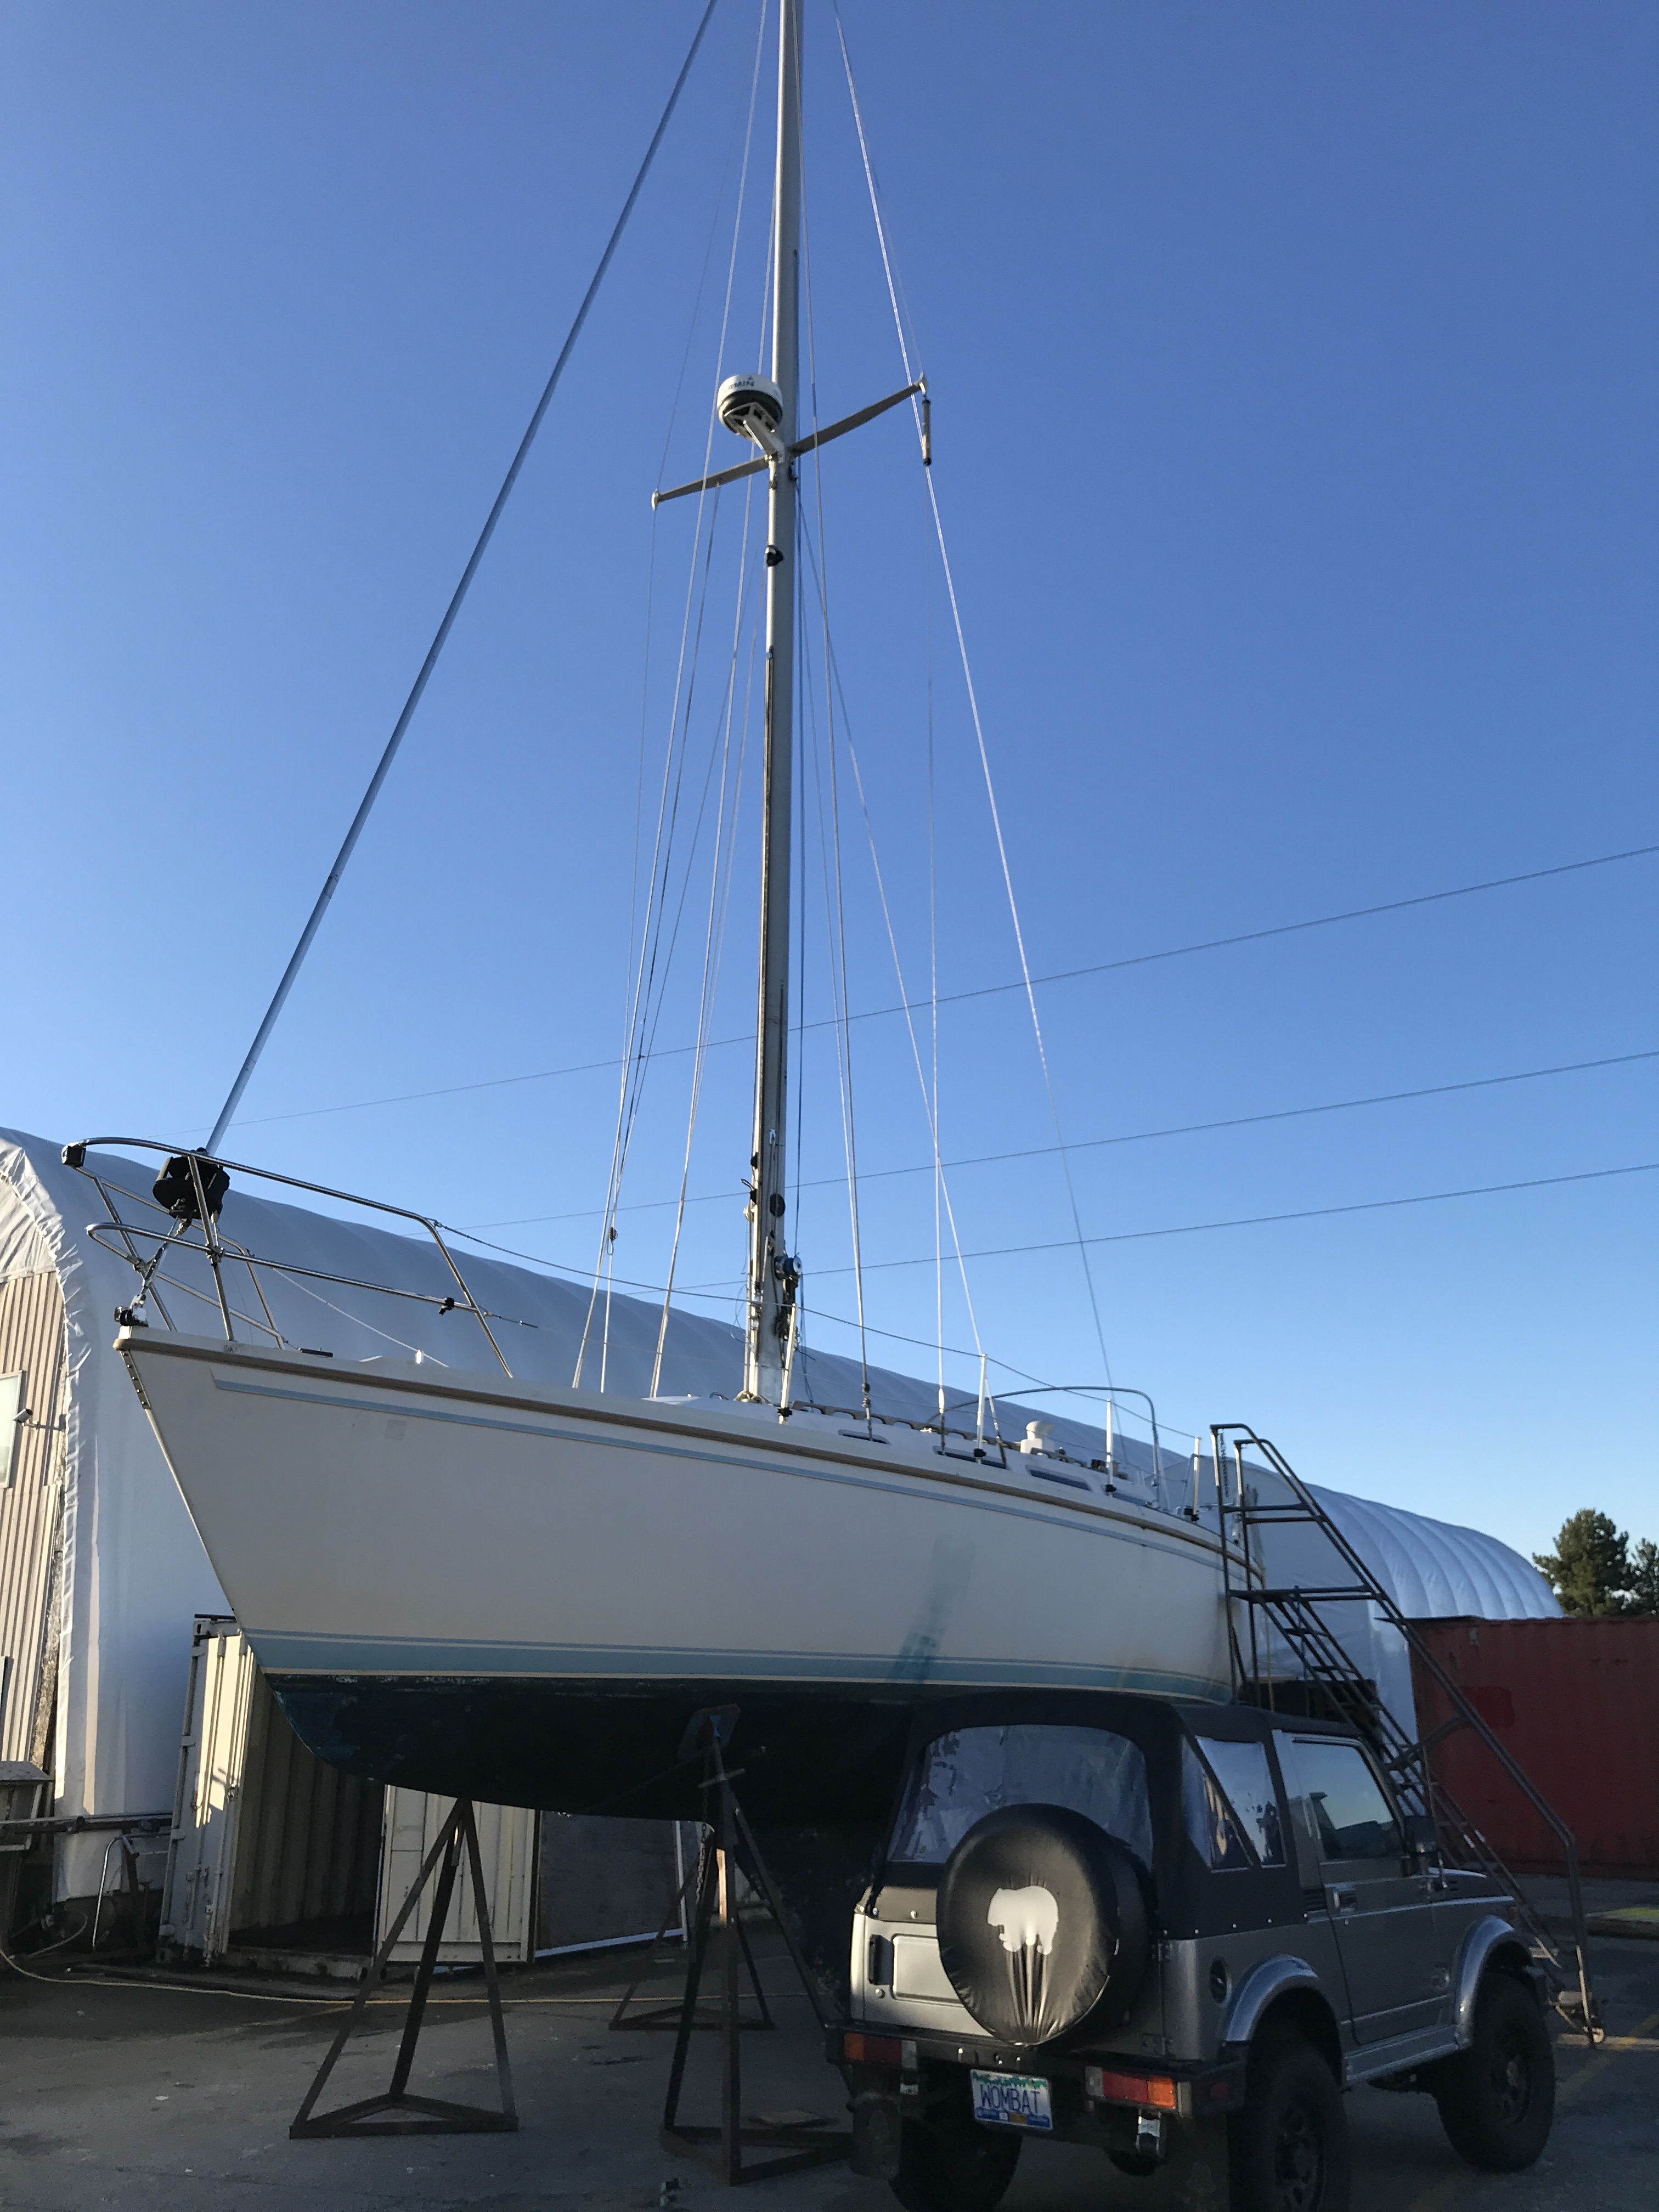
Well, we have the boat up on the hard and I planned to do a decent sand to remove the most recent bottom paint, then put a couple good coats on and away we go.
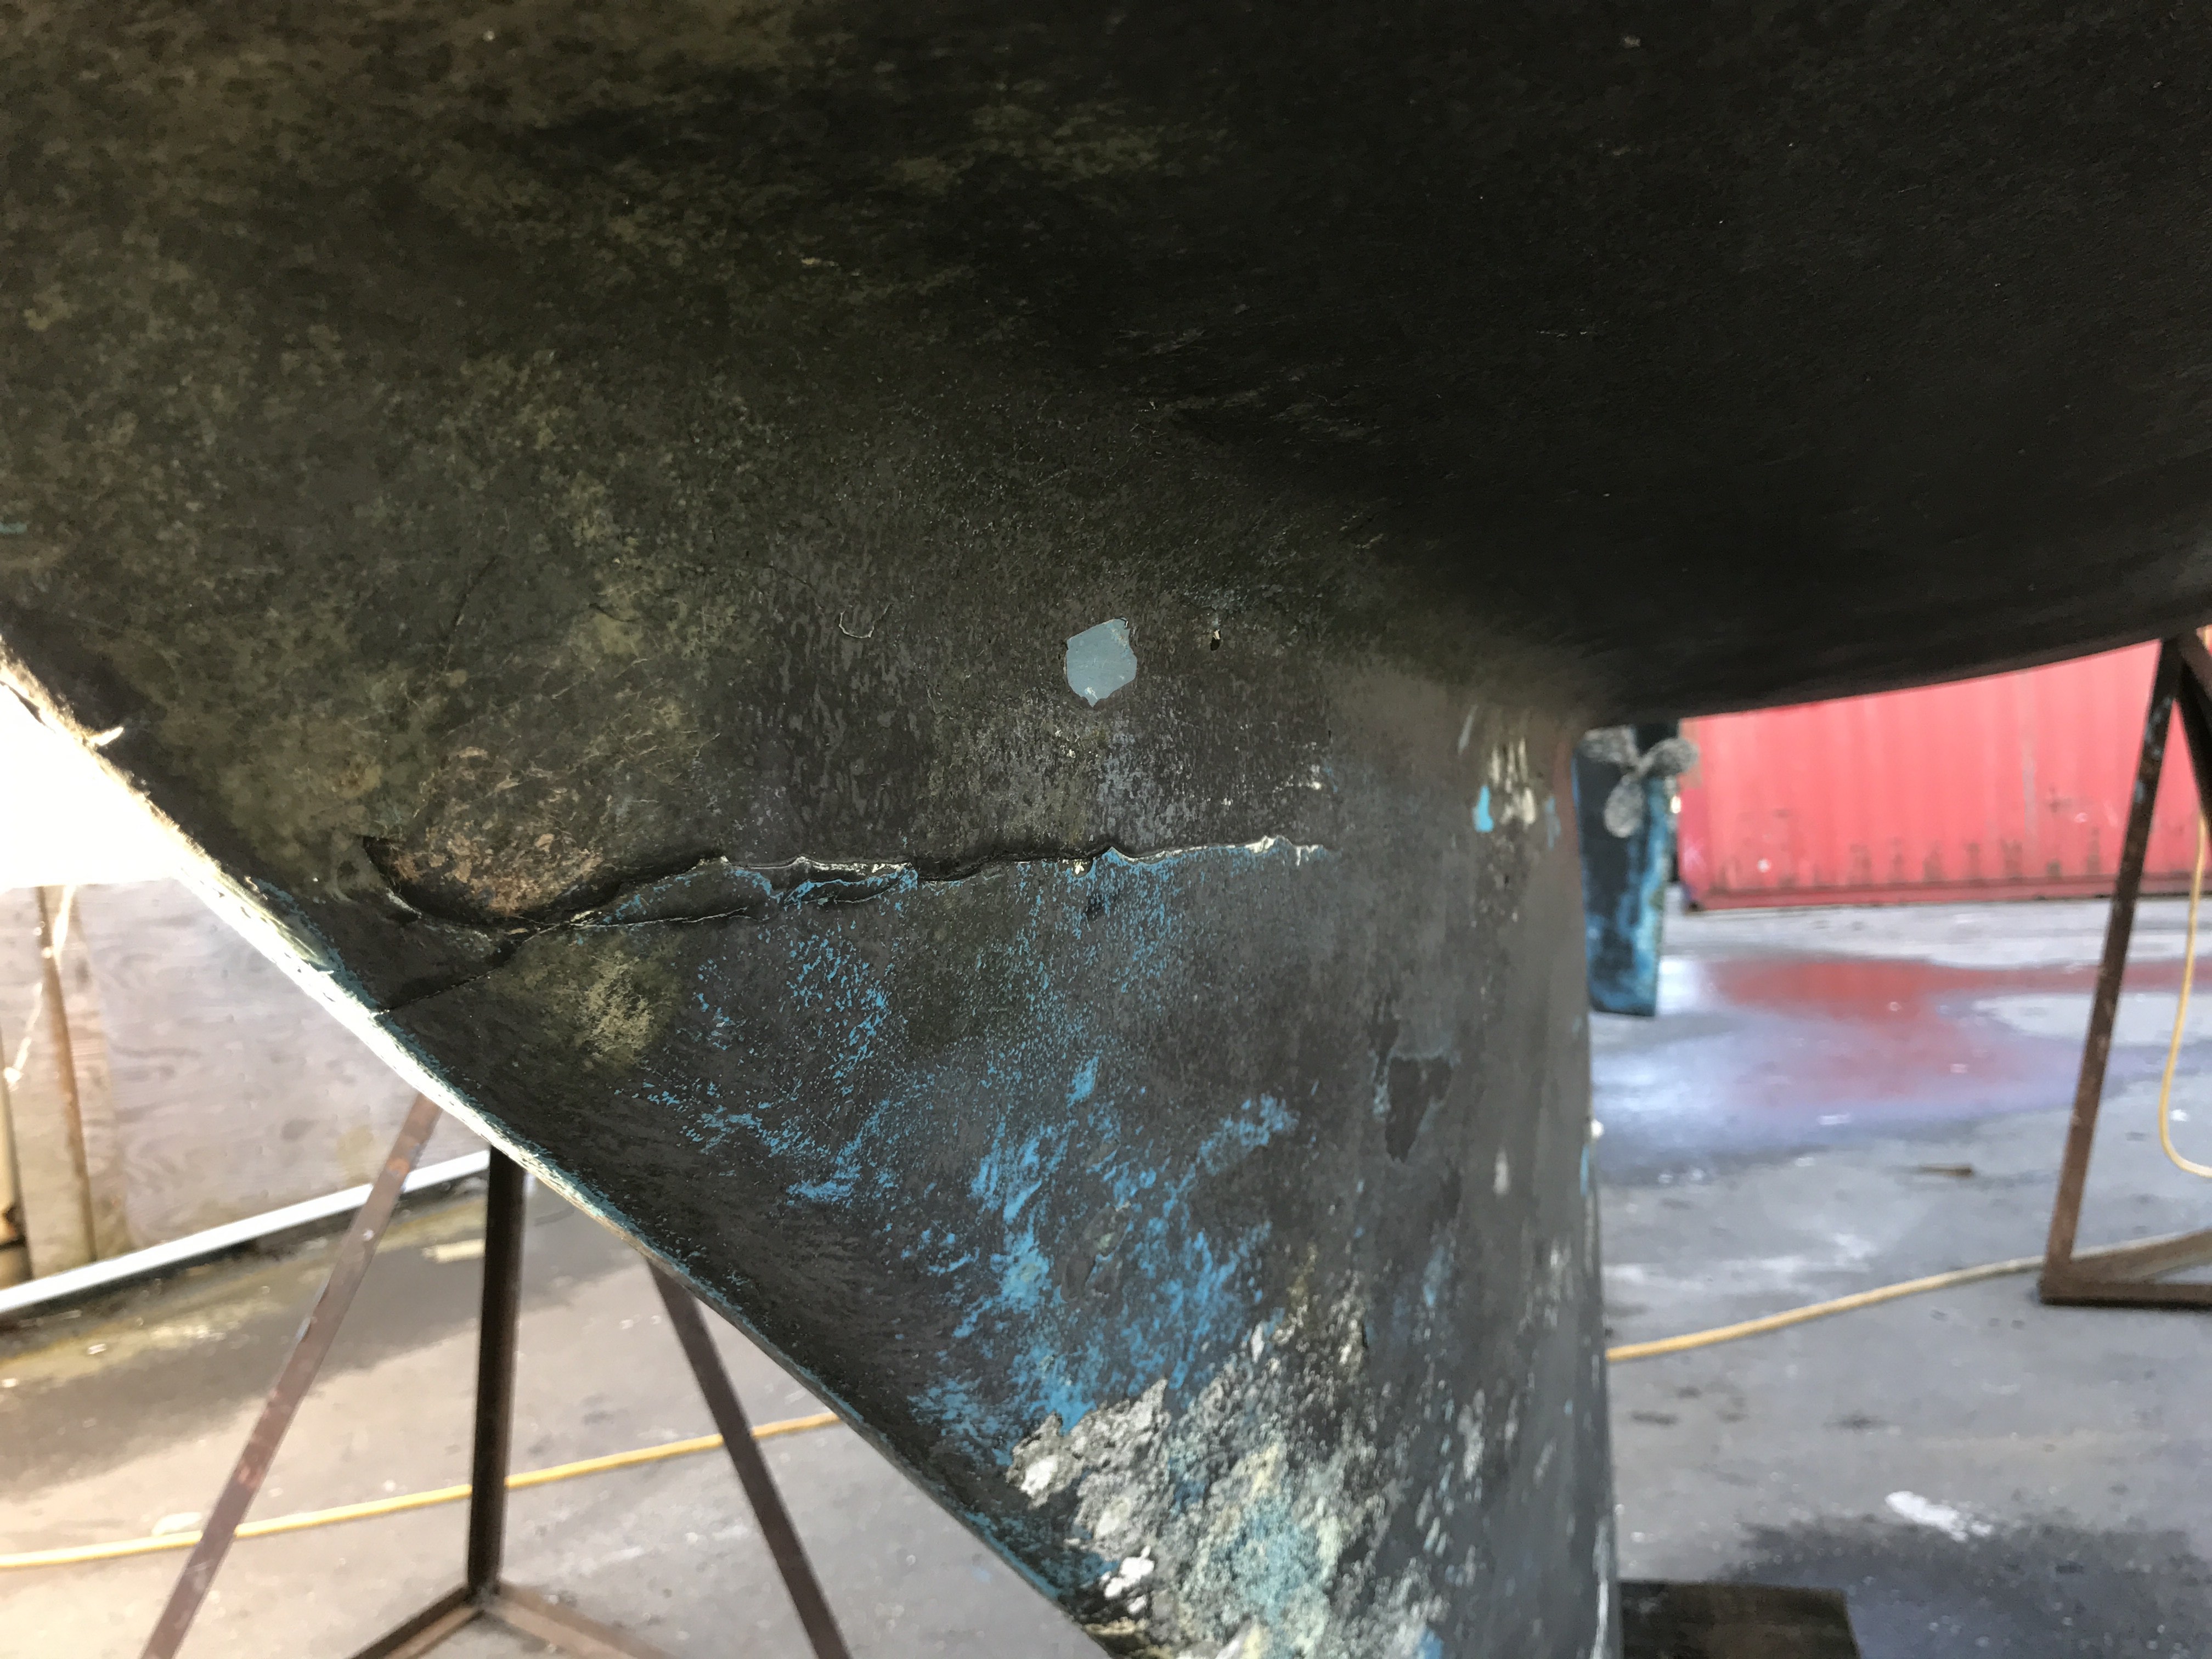
The surveyor did not report any blisters but of course there are hundreds of them. In addition, there was no mention of the "smile" but now that I have had time to look at it, I see that it must have been an issue and poorly addressed at some point.
I have limited experience with boats and bottom painting and as such I have a number of questions already. Time to turn to the experts....
I do not wish to pay thousands to have the bottom completely stripped and left to dry for months then re-coated. I am quite prepared to do some serious sanding and try to get at least most of the old paint off and see what shape the hull is actually in. How do I tell what is bottom paint, barrier coat or gelcoat?
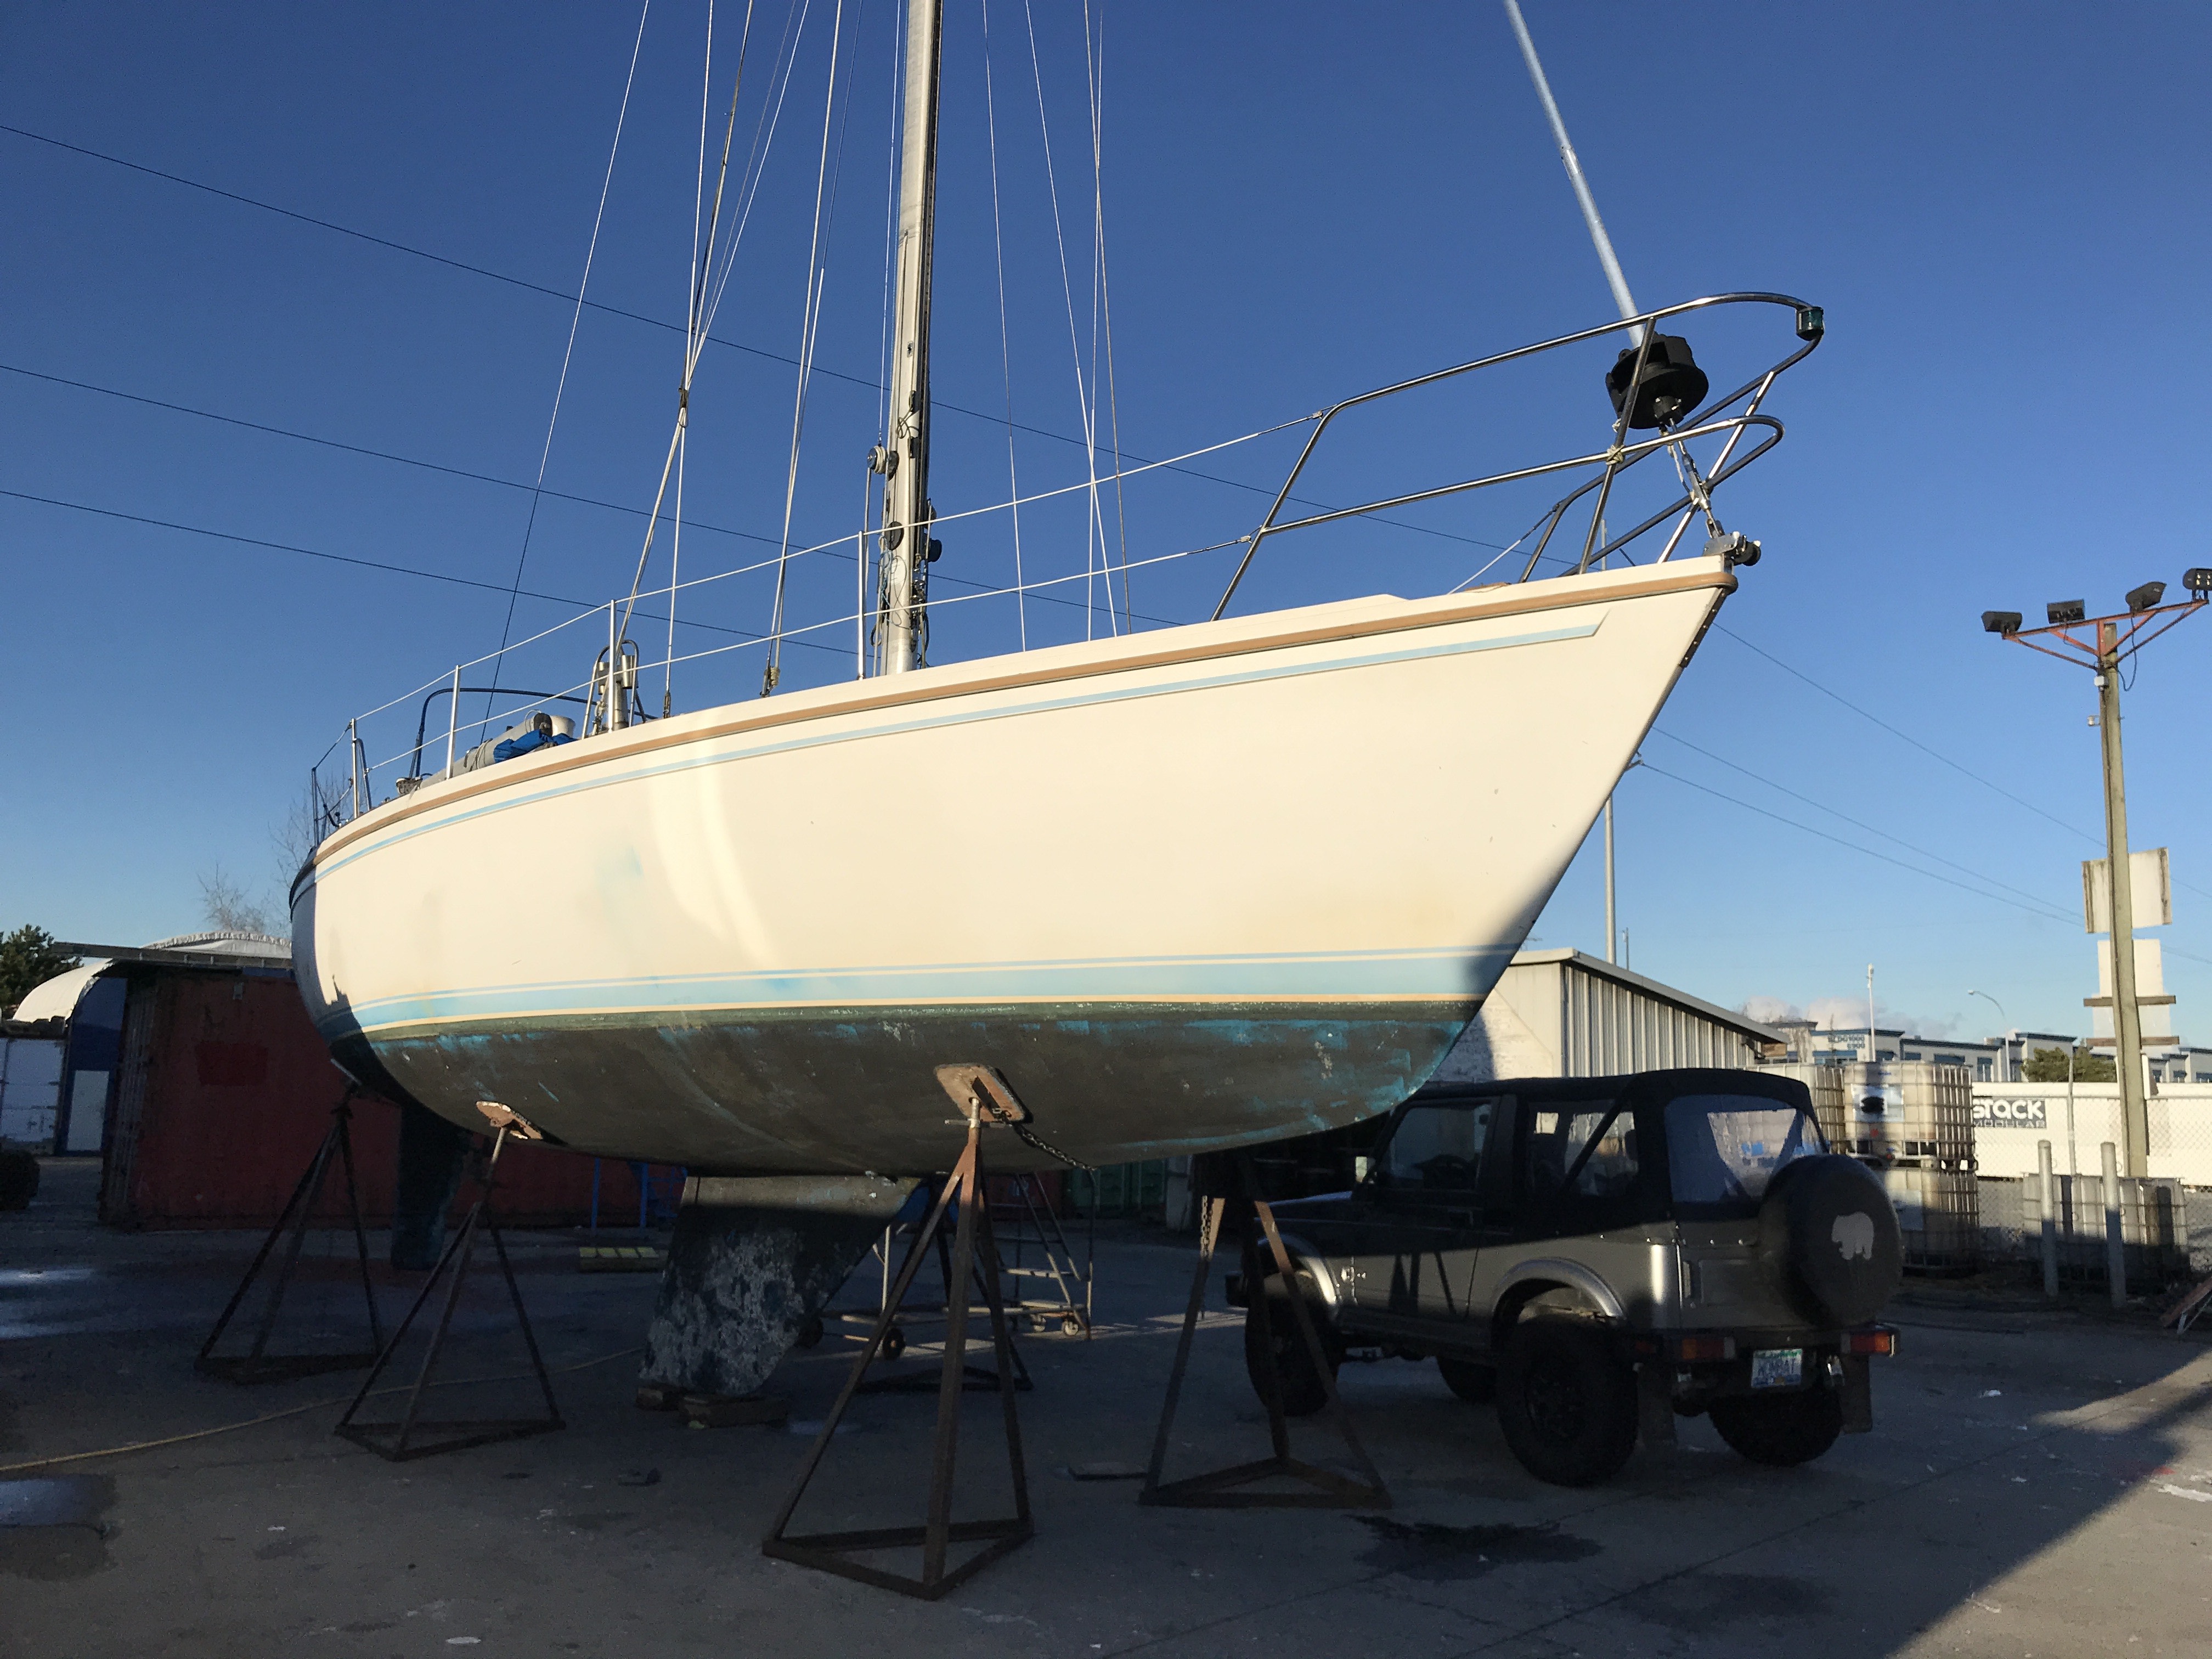
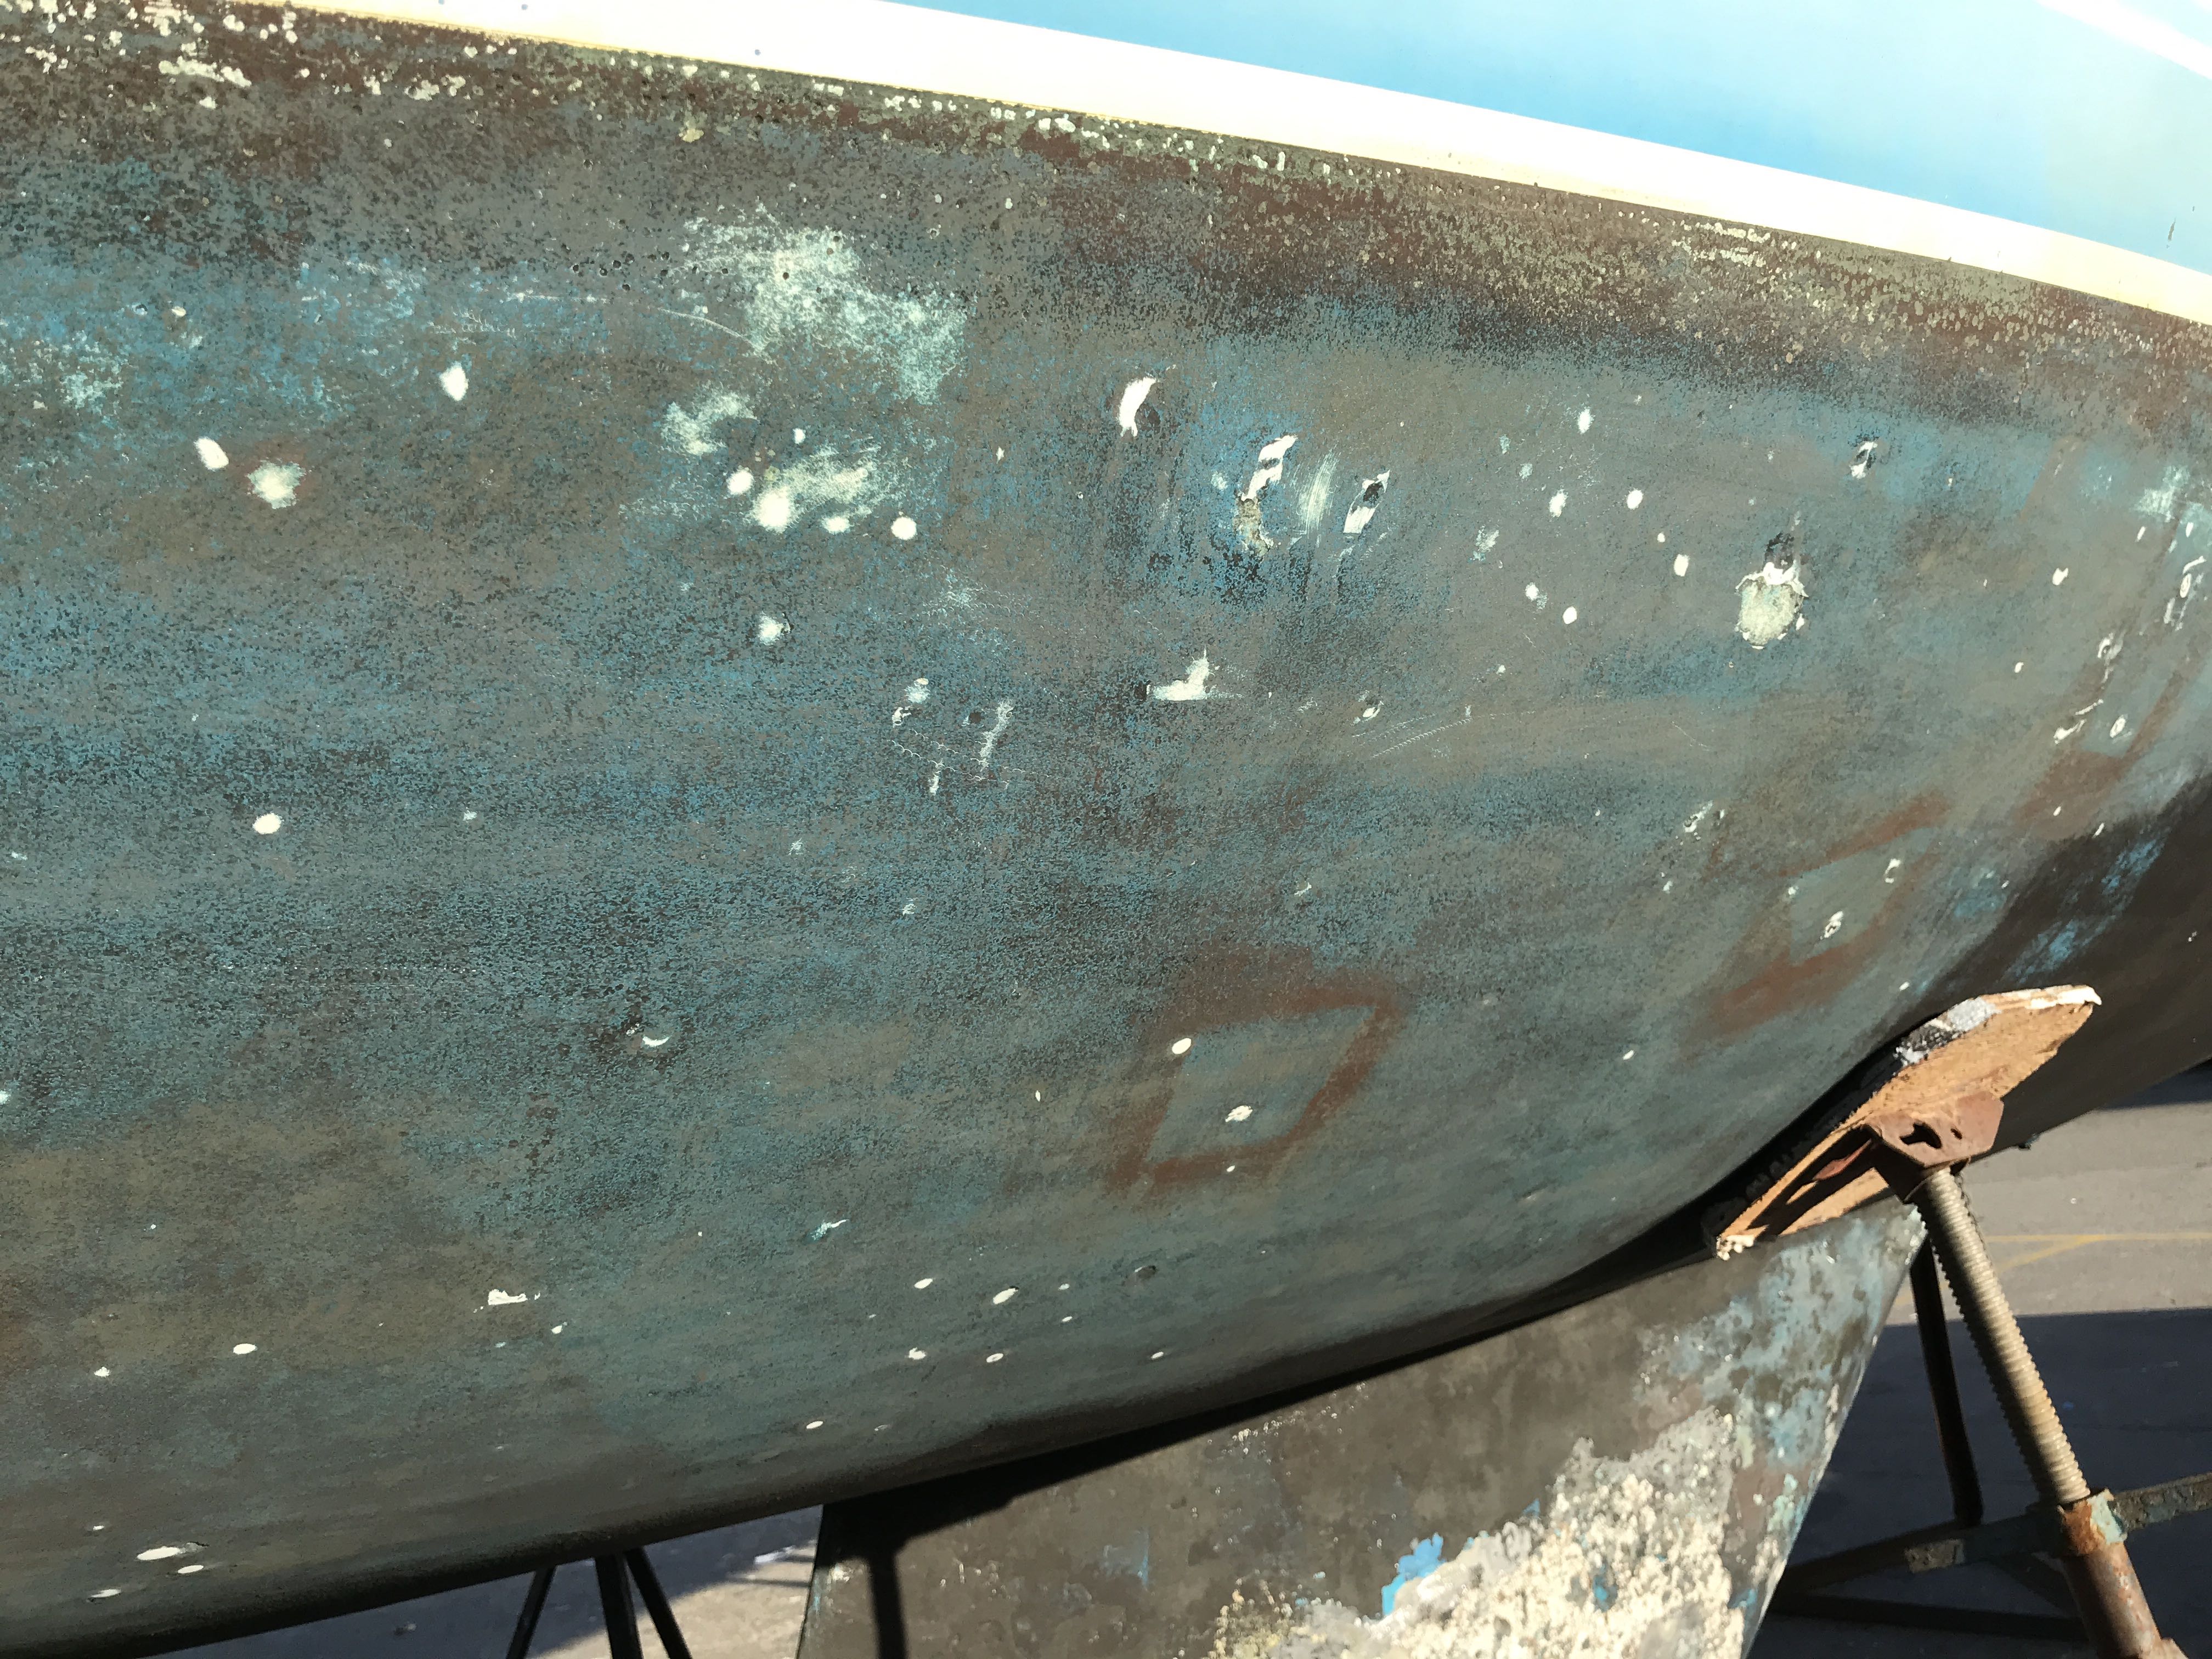
So far the top coat is black, then something rusty coloured and beneath that a light blue. I think the white that is showing through under the blue is gelcoat (please correct me if I am wrong). If I sand until I have mostly blue does that seem reasonable? I have 2 gallons of E Paint SN1HP. Should I be putting something under it?
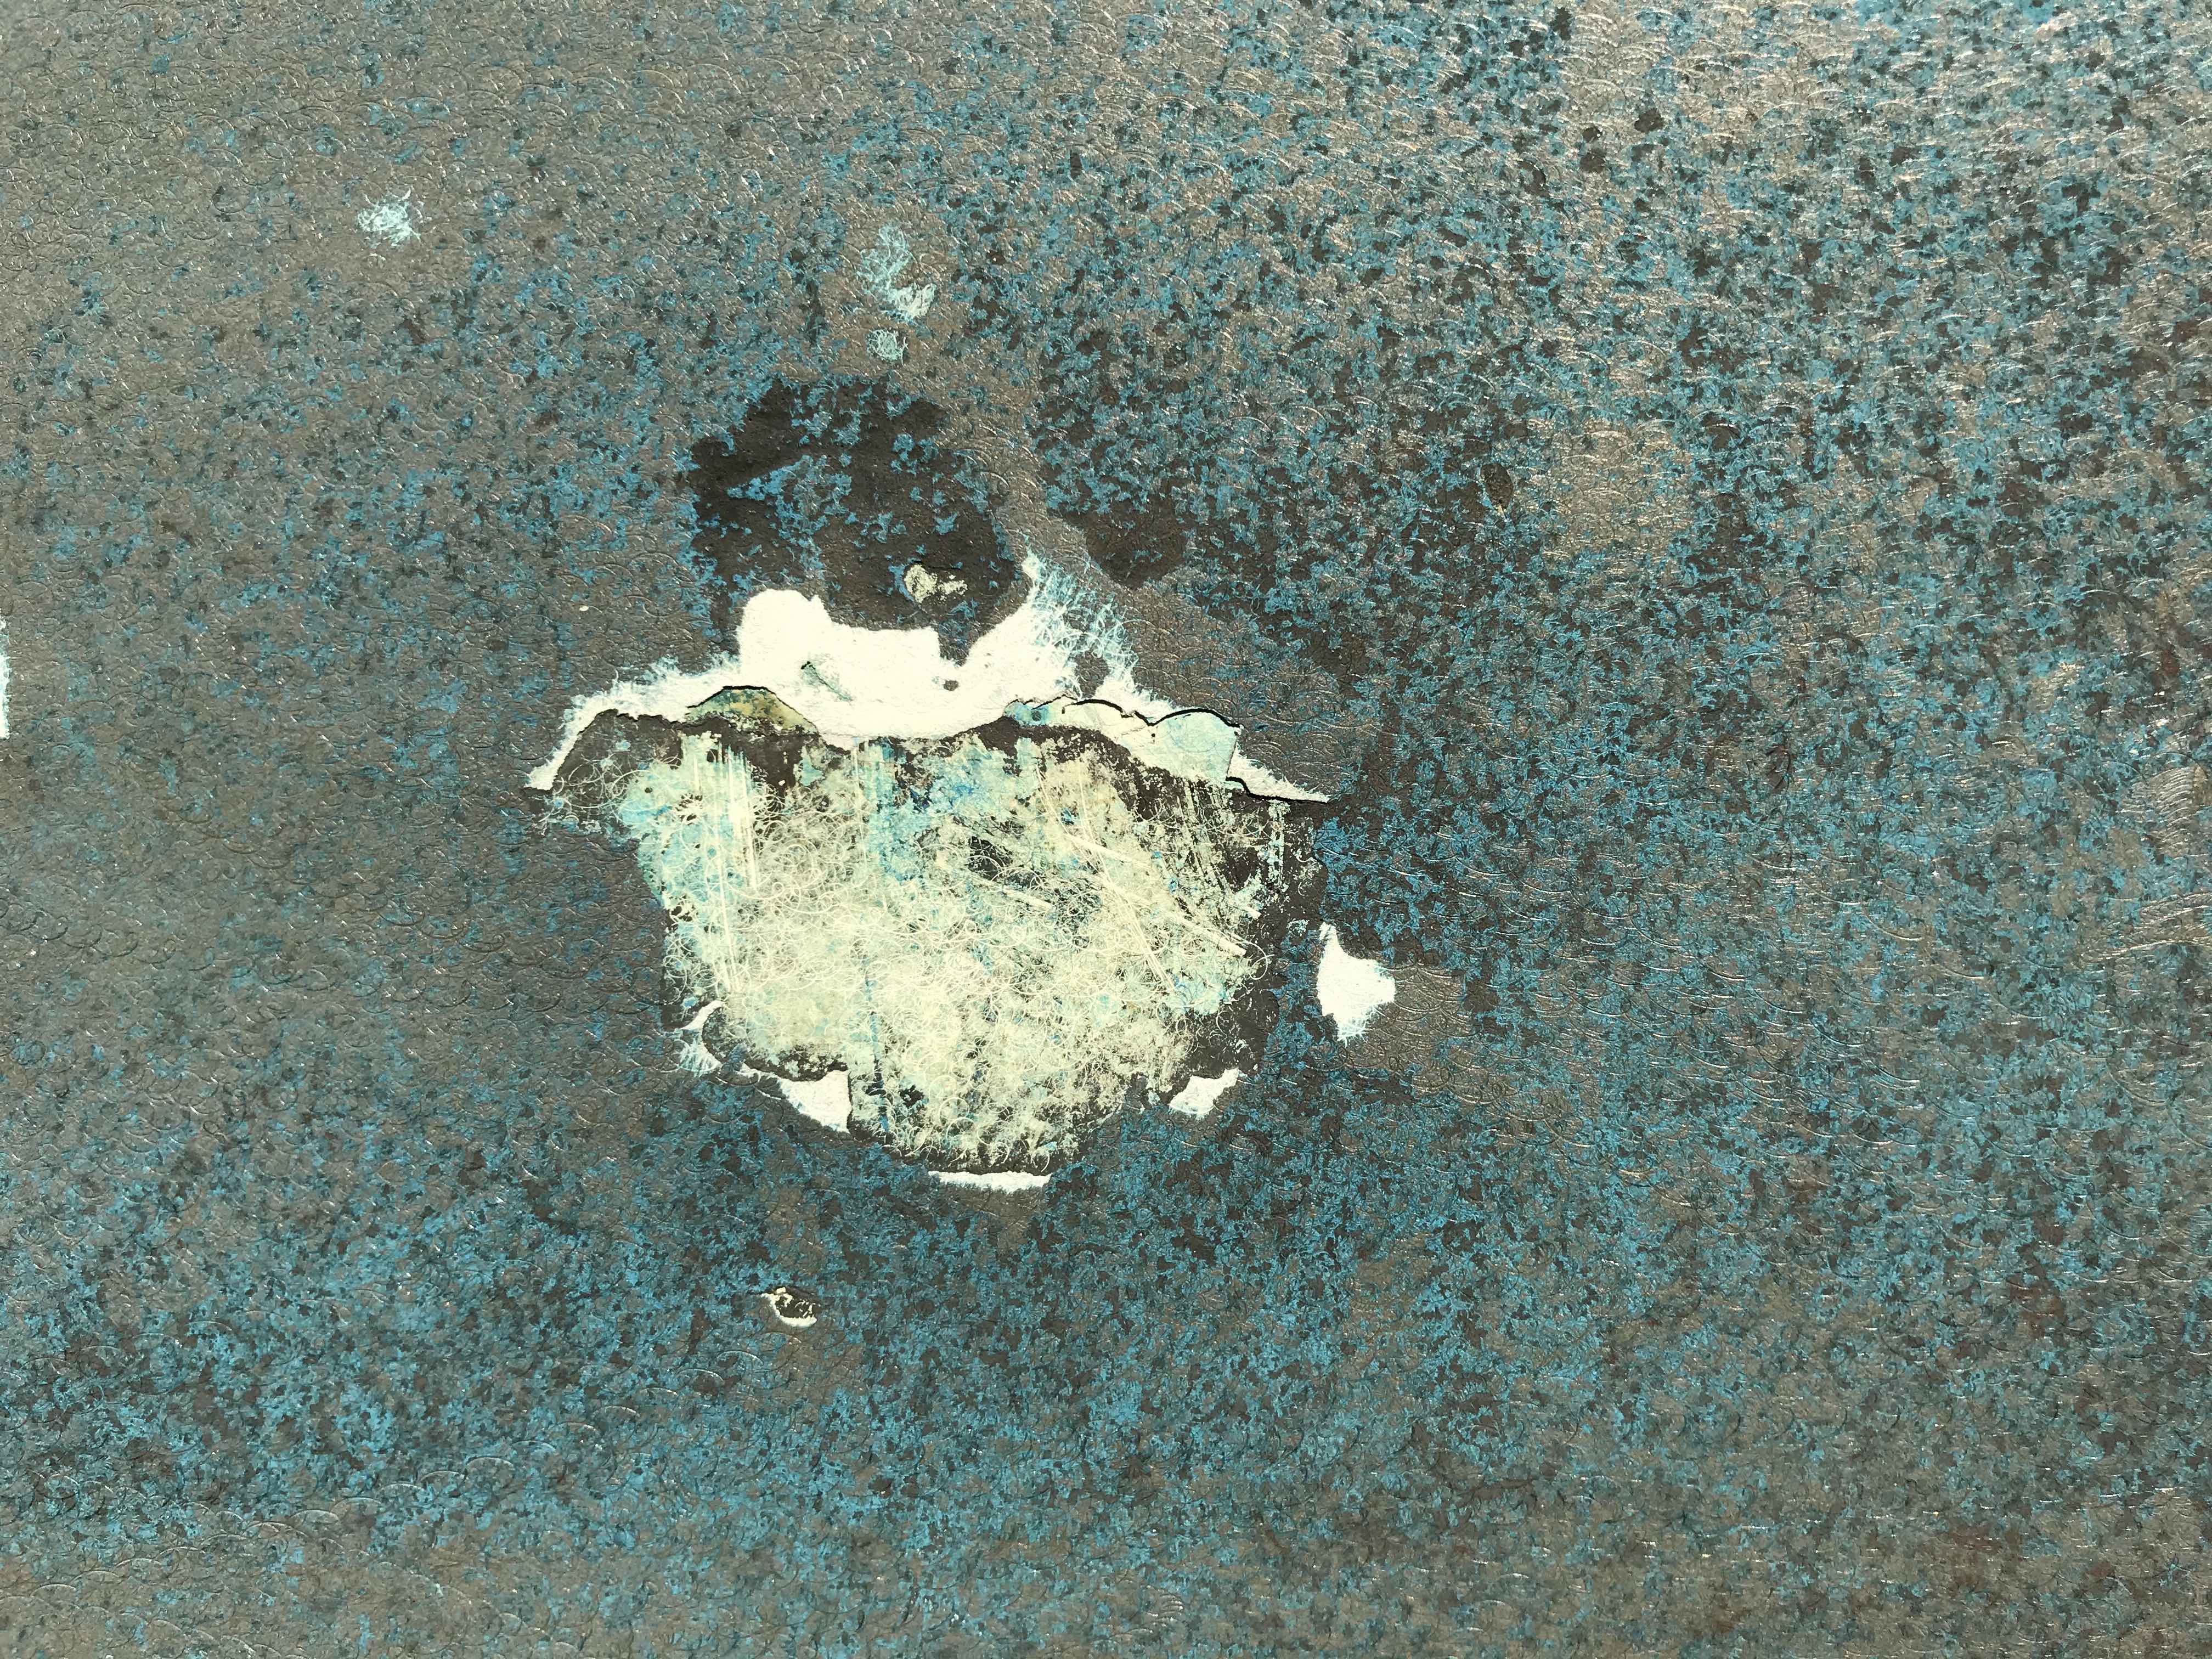
Some of the blisters were sort of fixed previously and they show up as white spots. There are many more that I will attempt to deal with another time. There are also a few bigger spots that I can't explain, maybe the gel coat is completely gone and it's just exposed fibreglass.
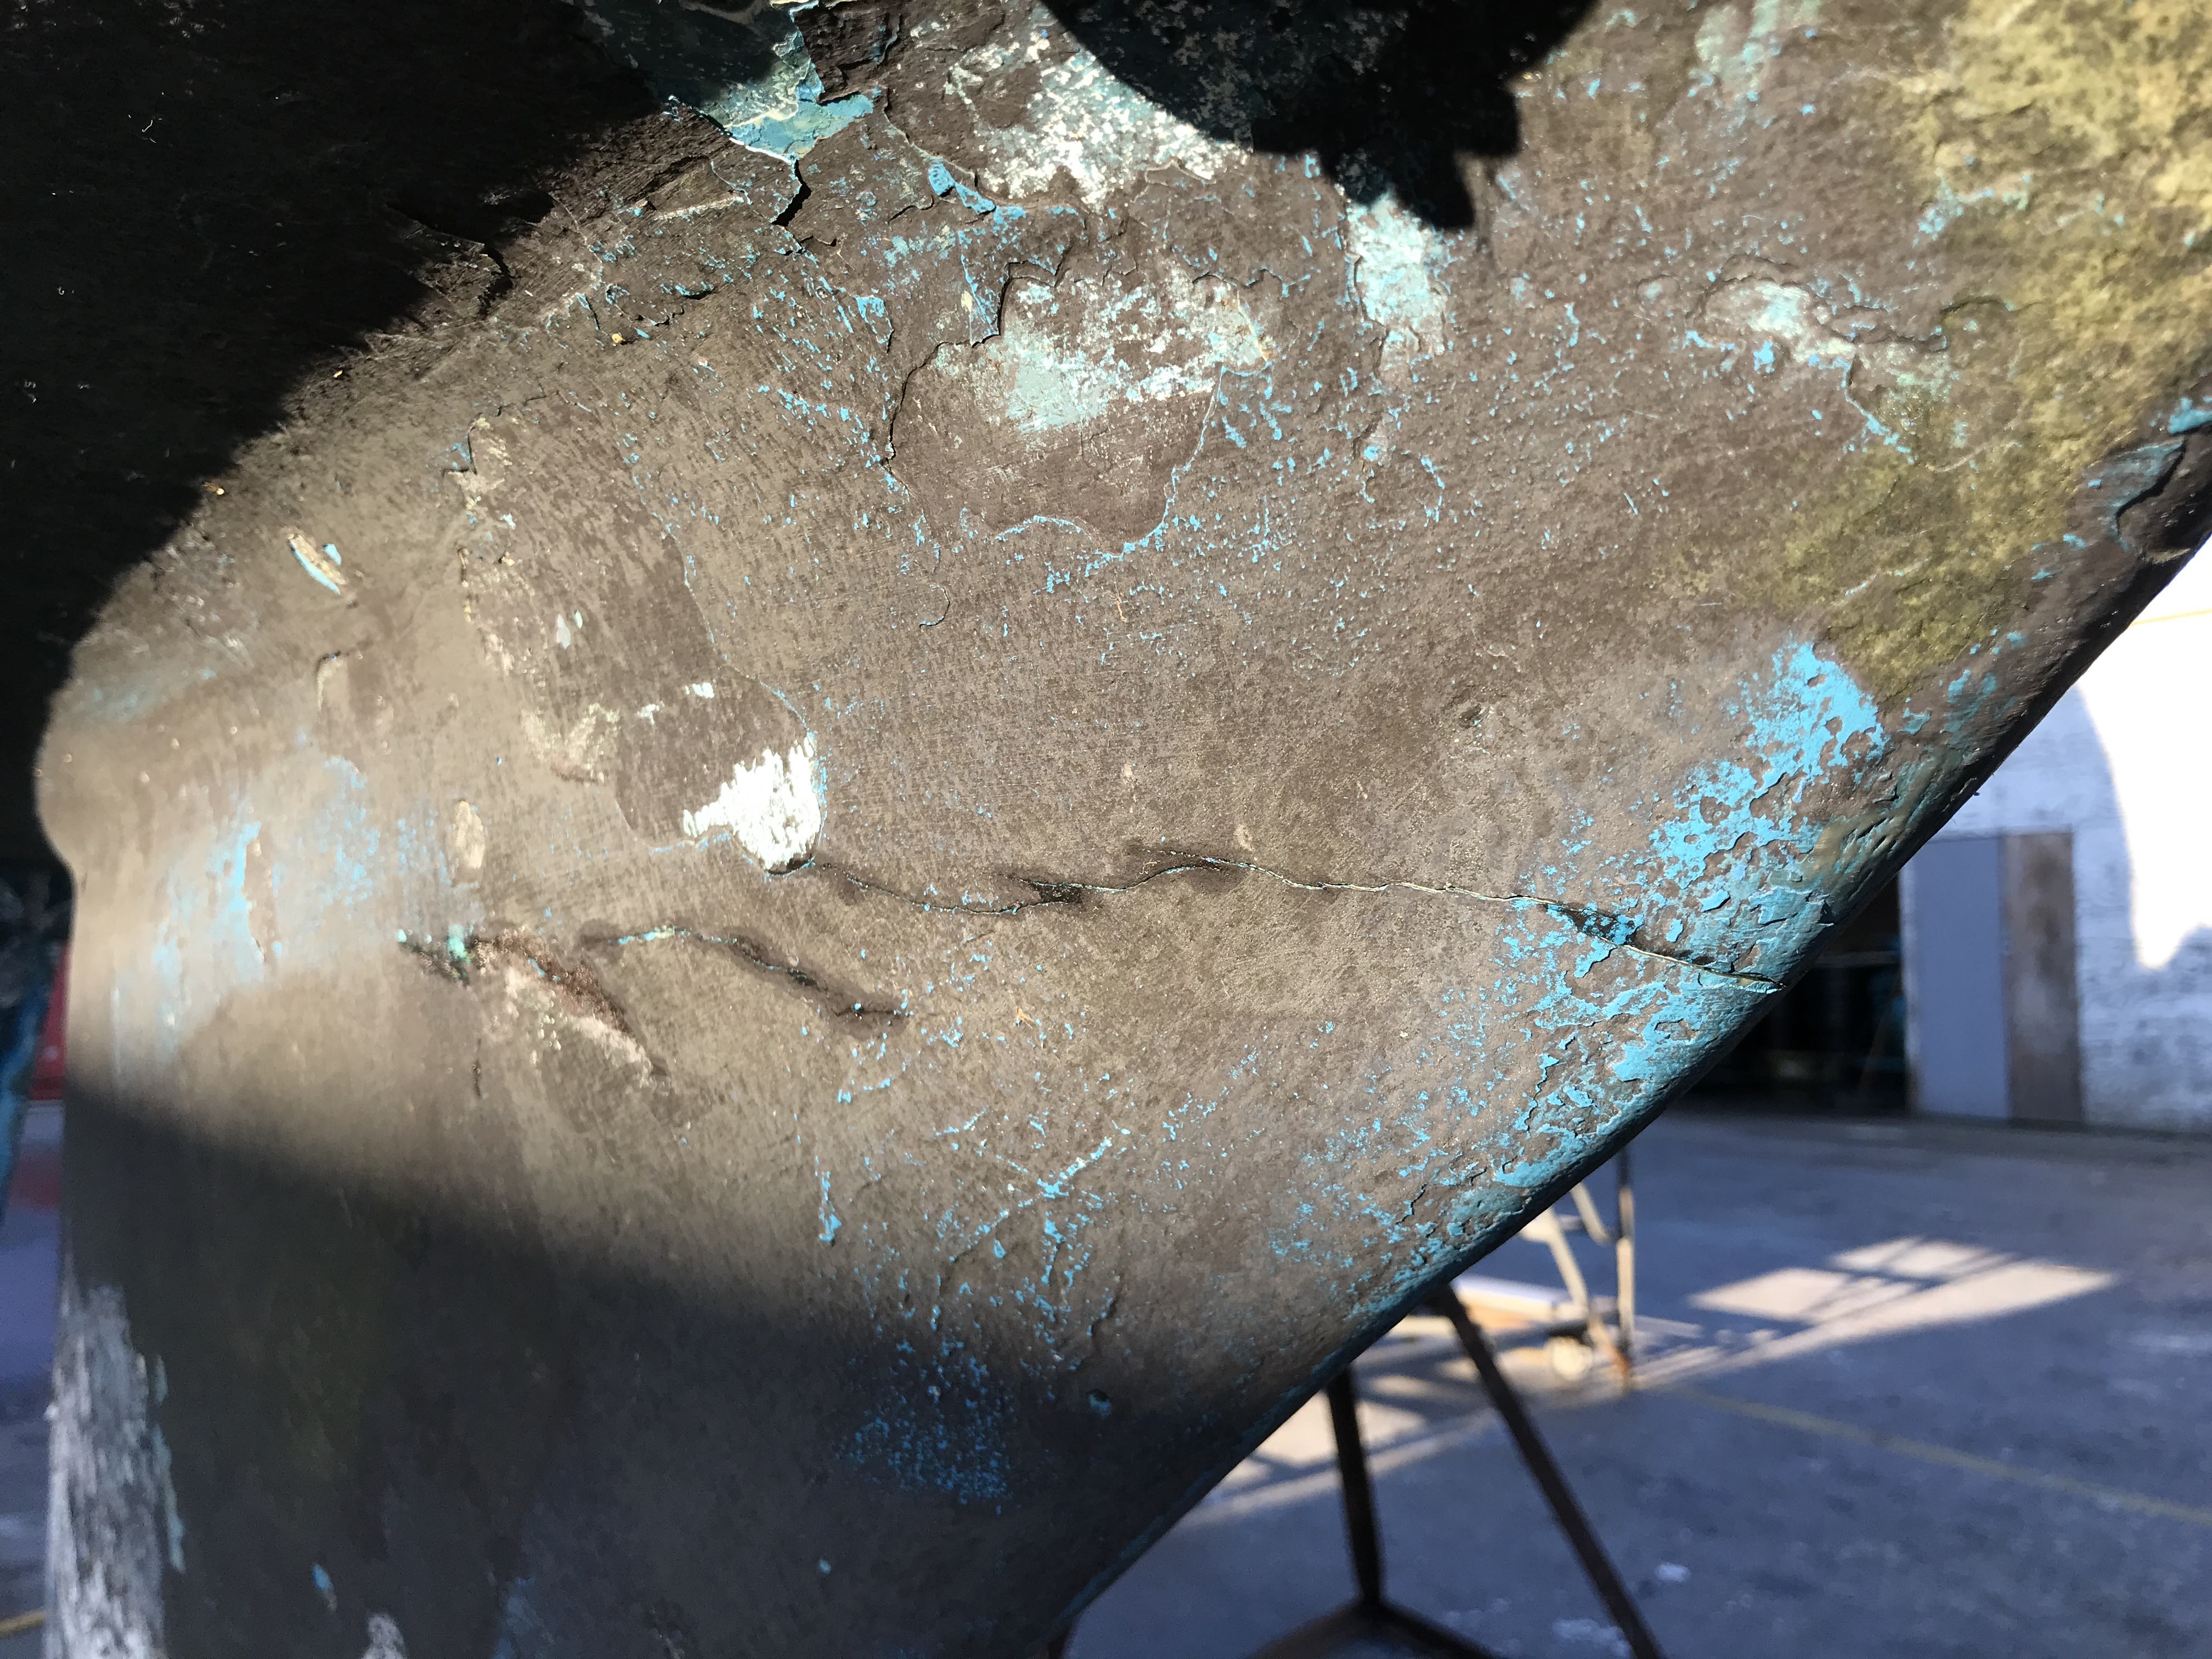
The smile is not visibly open and it actually looks like a ridge of thick paint or gel coat portside with a jagged crack starboard. I'm not going to worry about that right now either, the bolts look good and snug but we will check to make sure they are correctly tightened.
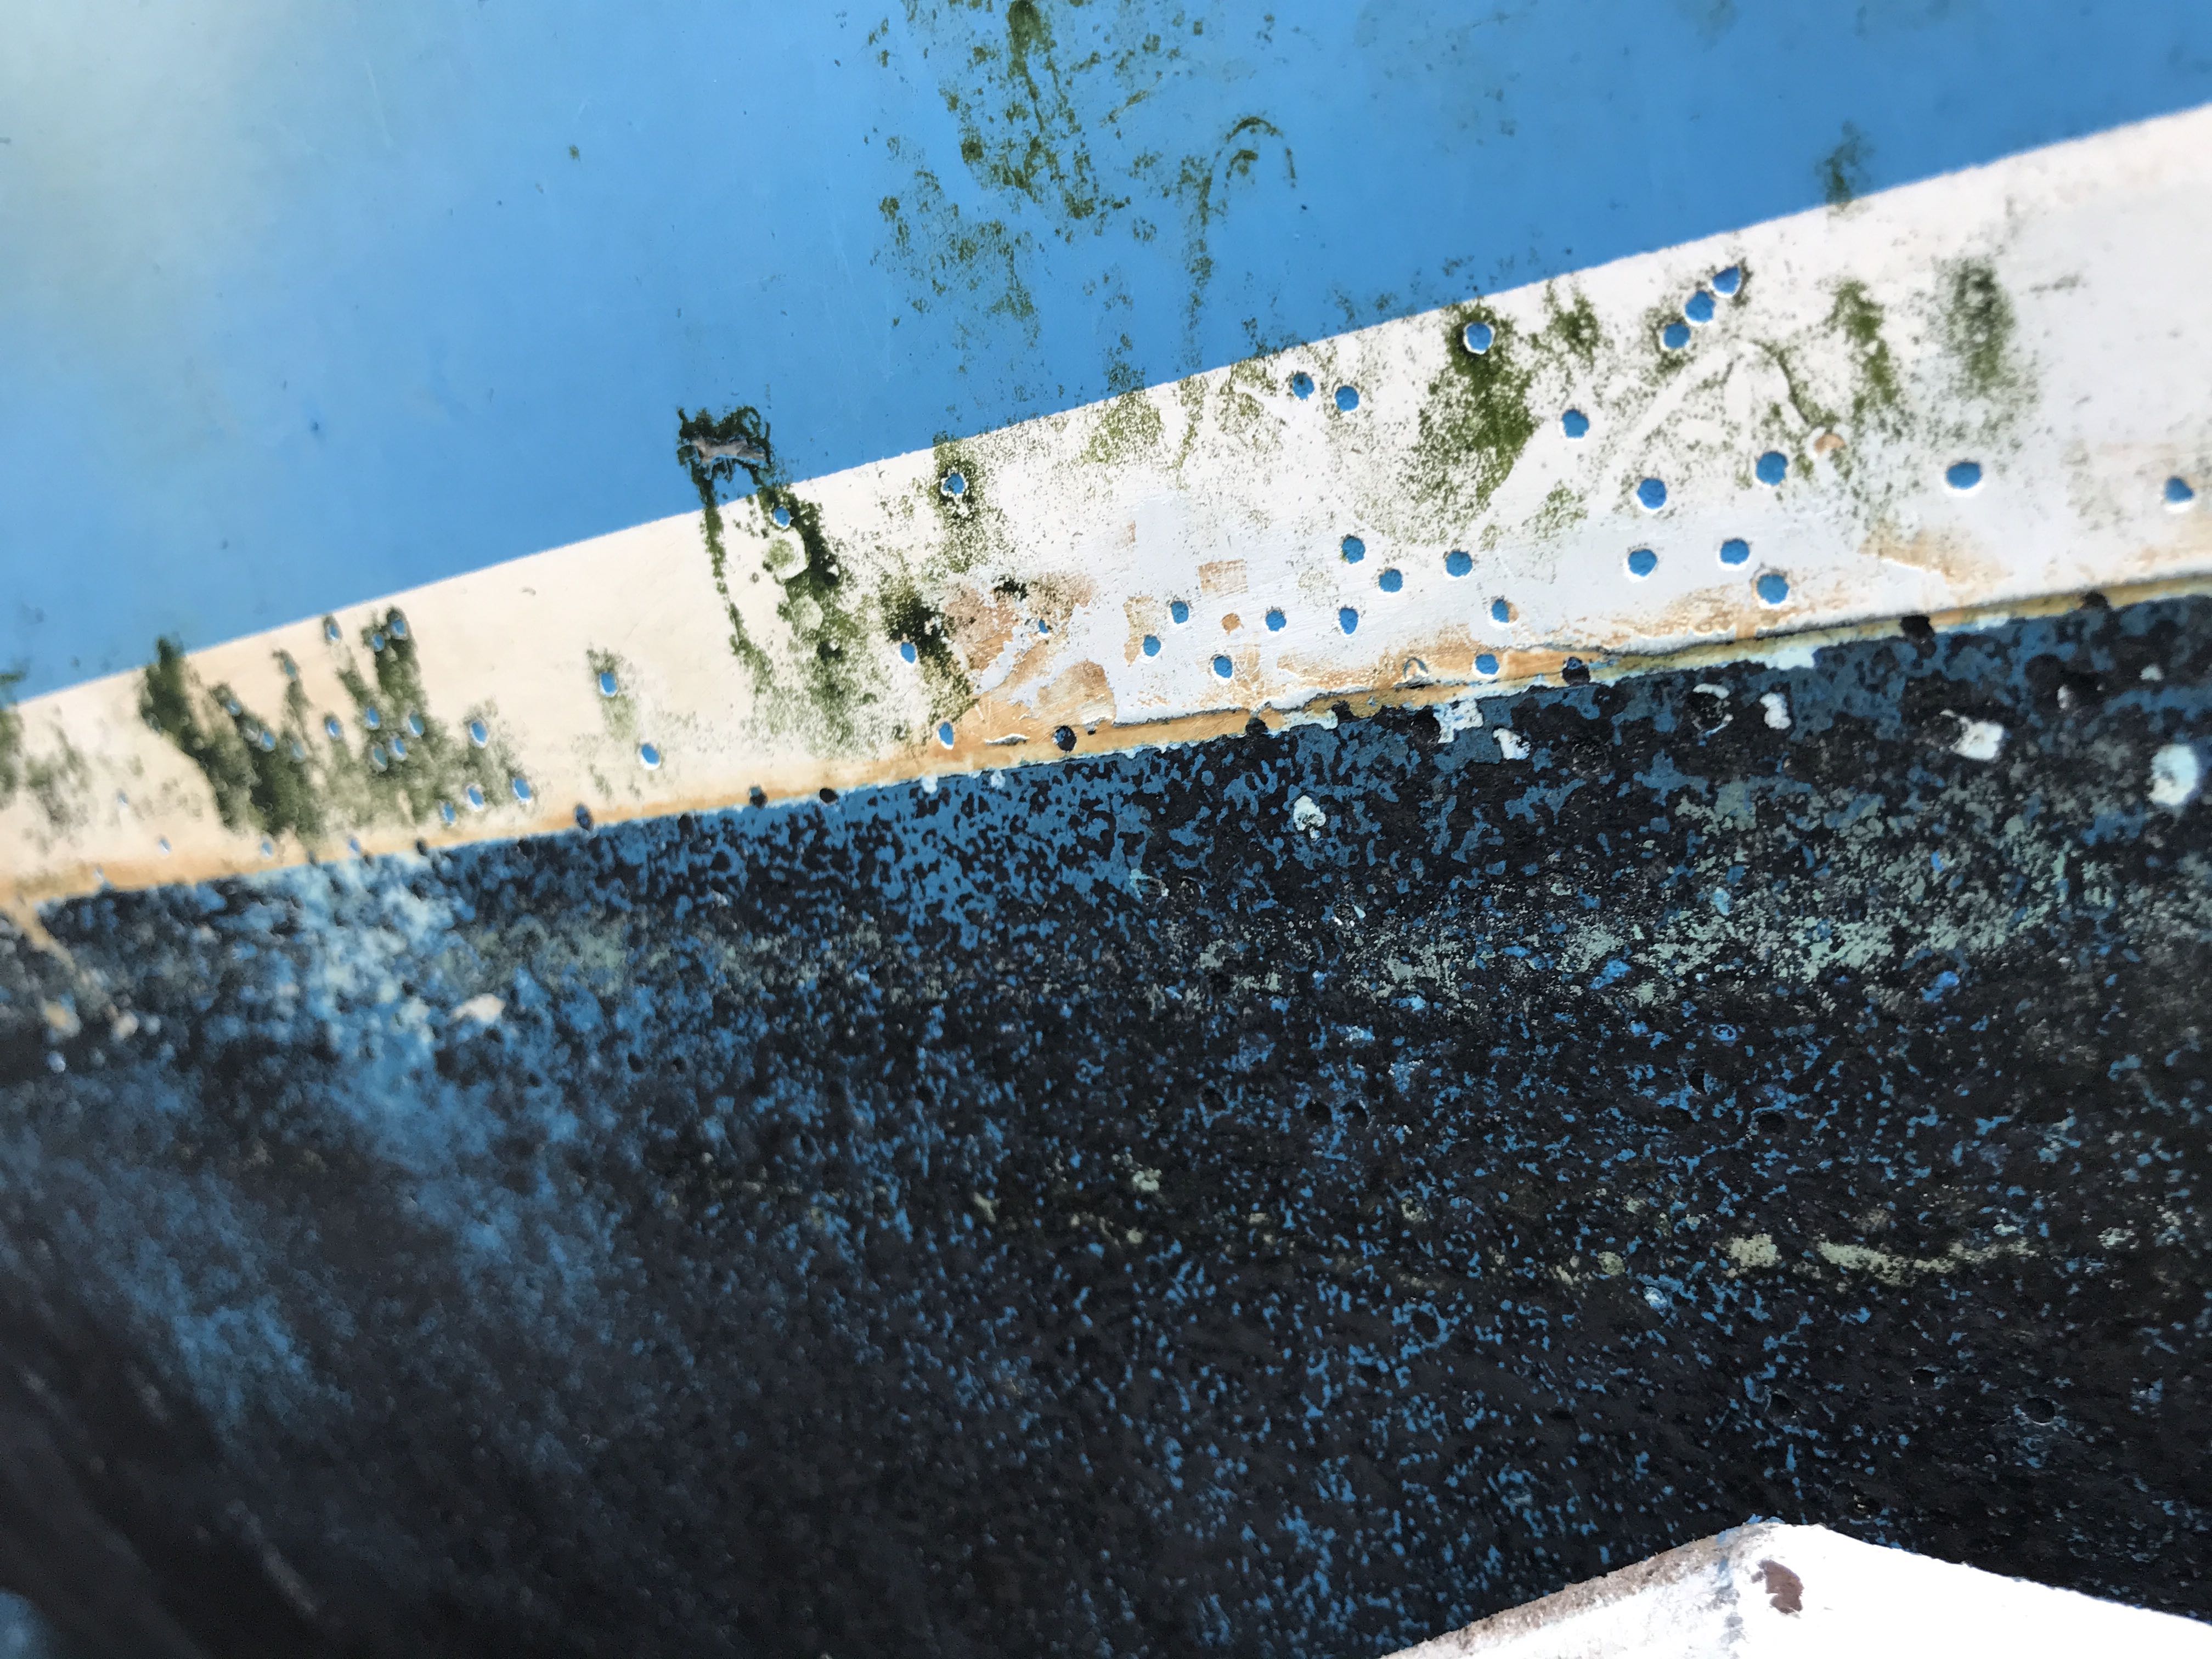
In addition, there are little pockmarks all along the waterline, well most of it. They only appear to be in the paint/white stripe and quite shallow. I am assuming that this is not something that I need to panic over and I could just fill them all and sand smooth then repaint. I can't seem to find anywhere that can explain what causes this.
Thanks in advance for any and all assistance. I don't plan to fix all the problems at once but it would at least be nice to know what they are.....
Cherel
sv Sidetracked
1983 C36 MkI #0157
Nanaimo, BC
Are you sure you have blisters and not just adhesion issues with the bottom paint? Blisters will be raised and contain fluid when pricked.
Stripping bottom paint, in my opinion, the least fun job of all boat work. I would advise getting a quote and at least considering it. Those guys usually have the right tools. Iv'e used stripping chemicals, chemically treated adhesive paper, scrapers and ultimately decided that a grinder was the solution that worked best for me. Hours and hours and hours later, (spanning many days) I was covered with black dust and covered the neighboring boats with grime too. For that reason, most boatyards require a collection cloth and plastic drapes to enclose the boat and capture the paint chips...and you should ware a face mask dust respirator and Tyvek clothing.
To apply a barrier coat, all the bottom paint needs to be removed.
Your "Catalina smile" is the largest I've ever seen. You should check the torrque on keel bolts, especially the forward ones beneath the cabin sole (remove the sole). I would also examine the bilge to see if the nuts on the keel bolts are depressed into the bilge (from over torquing, lack of washers to distribute force, sever grounding causing separation of the keel etc.) There might be someting structural going on . If all looks well, in addition to retorqing the bolts and removing all bottom paint, I would epoxy several layers of glass roving- 8-10 inches wide around the hull to keel joint and then fair it in....then apply the barrier coats as the final steps.
Paul & Wendy Keyser
"First Light"
Rye NH
2005 C36 MKII #2257
Wing, M35B
I 100% agree with what was posted above. There is something serious going on with that keel. Hopefully it just had a hard grounding and a bad patch job earlier in its life and there is no structural damage.
I had a similar problem with chunks of paint falling off because there were too many ablative layers ontop of each other(Think it was like 8). I had it sanded down to last coat/ barrier and raised the waterline to combat all the barnacles there. coat and then went with interlux Micron 66.
My bottom looked fine when I bought the boat, it was on the hard for 2 years. I even applied a coat of ablative before it went in. but being in the water for 6 months revealed how bad a shape it was in. I had to bite the bullet and redo it.
all those small dots look like someone scraped barnicles off and they took a layer of paint with them. Blisters are bumps filled with fluid, not the pockmarks like that
I attached some picks of before, sanded, and after. I put my catalina smile in there too so you can compare. I made sure to retorque and fair.
Thanks so much for taking the time to help me out.
Yes, there are some spots where it is likely just bottom paint issues but I have found some blisters that definitely had liquid in them when popped. I intend to sand the bottom as much as I can manage over the next few weeks, then put a couple good coats of bottom paint and leave the blister issue until we haul again, probably next year same time.
I am not sure about the small pockmarks, they do seem to be mostly quite uniform in size and small. Not all the way around the boat, probably 3/4. Only within 6 inches of the waterline. Very odd.
As for the smile, I have no idea what went on under the layers of paint, filler and possibly gelcoat so I plan to just strip it all off and do a proper assessment. Near as I can guess, the previous owner addressed the issue somewhat but didn't remove any of the coating from the keel. When the bolts were tightened up, the coating pushed up on the sealant that was protruding from the gap and formed a bit of a shelf (for lack of a better word). It does appear to be dry but until I take the very thick and solid layer off, I won't be able to tell for sure. In the end I will be left with a bare keel and some idea of what else needs to be done.
The bolts appear to be in very good condition, there is no indication of deterioration or softness and everything is shiny and clean. Once I have the outside cleaned off we can make sure the bolts are properly tightened.
I will take pictures as I go in case anyone else is interested in what I find under the layers. I really appreciate the photos, and especially knowing how much time it takes to post them. Thank you very much for your time and replies.
Cherel
sv Sidetracked
1983 C36 MkI #0157
Nanaimo, BC
I am not sure about the small pockmarks, they do seem to be mostly quite uniform in size and small. Not all the way around the boat, probably 3/4. Only within 6 inches of the waterline. Very odd.
Looking at your pictures my initial thought was the boat was shrink wraped. I noticed on a friends boat years ago that he had these small pox marks along the waterline and looked around at some other boats in the yard. It looks like when they heat shrink they may have applied heat close to the hull. Several boats in the yard showed these pox marks and some were still covered which led me to my conclusion.
Gary Bain
S/V "Gone With The Wind"
Catalina 36', Hull #: 1056, Year: 1990, Engine: M-35
Standard Rig
Moored: Boothbay Harbor, Maine
Home: Auburn, Maine
Cherel,
When I purchased my boat several years ago, the bottom looked fine and had just been re-painted with another coat of ablative bottom paint. Two years later in the toxic waters of sunny Florida, my bottom was similar to yours without the heavy barnacles.
The large areas of paint breaking off are most likely due to the aging of the substrate surface underneath the bottom paint, namely the barrier coat. It will be necessary to strip of all the toxic bottom paint and the barrier coat, then re-apply the barrier coat, then the bottom paint. This is usually a time consuming job and one that requires some prior knowledge of how much material to remove. Since you are new to this, as we all were once, let me mention some thoughts;
The bottom paint is highly toxic to humans and it takes quite a bit to remove it. YOU absolutly need the correct type of resperator, clothing and vaccum type sanders to accomplish this job, not just the stuff you pick up at Home Depot.
This may not be a do it yourself job. Many yards will not allow you to sand the botton because the toxic dust falls to the ground and contaminates the soil beneath the boat with the dust. Many yards will demand that you have a vaccum type sander to gather the toxic dust and even then they will impose restrictions on you because of the blowing dust.
There is another option that you might consider to eliminate all of this. Get prices on a total soda blasting of the bottom. Essentially, these folks come in with a sand blaster and will get all of the old paints and coatings off. That may be your best option since I believe you'll need the barrier coat to re-applied. Here's the typical (bad news) costs here in Florida as of last November 2019.
Total soda blast the bottom on a C-36 including clean up and waste disposal. $1600.00
Three coats of Interlux barrier and three coats of Micron-CSC bottom paint. $1575.00 (and that you may be able to do yourself)
.
Bill Dolan 1990 Catalina C-36 MKI - Hull #1041 'Williwaw'
Std. Rig, Walk Through, Wing Keel
M35, Oberdorfer Conversion,
Home Waters; Charlotte Harbor & The Gulf Islands of Florida
'You are never out of work if you own a boat'
Having done this by myself in the past, believe me, if you can find somebody to soda blast for $1600 or even $2500, write the check. Again, it's a miserable task to undertake. Just my opinion
Paul & Wendy Keyser
"First Light"
Rye NH
2005 C36 MKII #2257
Wing, M35B
Well, a fun filled day today. I spent some time digging out the filler on the front of the keel around the join to see if I can figure out what has been done previously. John also checked all the bolts and found that they are tight and in good condition.
As for the smile.... it appears that at some point it was filled and then a thick layer of something was built up over the forward edge of the join and poorly finished then coated over time with a few layers of bottom paint. The ridge of filler on the Port side still makes no sense to me. As ugly as it looked, it was clean and dry inside with no evidence that water has been present and it was quite difficult to remove the filler. I am confident that if I had not been banging away with a chisel and hammer it was not going to come loose or leak. The wet cracked spots on the port side were superficial, the filler was fine.
My question for the day is one I really hope someone can answer. What are the matching holes in the lead and hull for? Is this normal or speical to my boat?
So, I think that I will just replace the filler that I removed and smooth everything out. I've asked a guy at the yard to come and give me a quote on the soda blasting. Even at $1600 that is still much more than I can really justify at this point.
I have time to work on this project, a good sander with shop vac attached and a mask with all the proper filters etc. We chose this yard because it allows us to do all our own work if we choose. As long as I use the vacuum they are fine with my sanding the paint and I definitely will be putting the anti fouling on myself. I do appreciate that it will be a whole lot of work but am prepared to at least try to do it. If I can't, then the blasting guy is literally just across the yard.
Thanks again for all the comments. I take comfort in knowing you are all out there.....
ps... we pulled the mast today and will be starting to replace the mast step tomorrow. should be fun
sv Sidetracked
1983 C36 MkI #0157
Nanaimo, BC
Regarding re-torquing the keel bolts: You should know that members of the C36IA (at least those located in the USA) have access to various loaner tools, among them a set off special deep sockets and a torque wrench for the keel bolts. I mention this because I was the last user and the tools have been sitting in my cellar for the past couple of years (as no one has asked for them to be passed along).
There may, alas, be some duty or other issues involved in shipping them to members living up in the "balcony" section of the continent, so to speak (sorry about that!), but perhaps if I sent them over to our fabulous Commodore Les Troyer, who I believe lives not far away in Everett (and who constructed a nifty box for the tools whne last in his paws), you could rendez-vous.
PS: As to your "question of the day" I can answer the second part by reporting that I've never seen them on my boat or any other C36 hull (there's usually a few others in the yard when we get hauled for the winter). As to the first part, I have no idea what they are for or from (worms don't usually attack lead).
Matthew Chachère
s/v ¡Que Chévere!
(Formerly 1985 C36 MKI #466 tall rig fin keel M25)
2006 Catalina Morgan 440 #30.
Homeported in eastern Long Island, NY
Could the previous owner have tried to attach the two halves with screws and metal braces that have rotted away? I'm mystified as well.
Maybe reach out to catalina?
Another fun filled day behind us. We may have an answer to the question of the holes in the lead and hull. Theory from boat yard folks is that they were intentionally drilled to assist the filler in finding places to adhere too. I'm not entirely sure I believe it but have no better ideas to suggest.
Chachere, we would very much like to make use of the tool kit. I remember reading about them and then completely forgot. We have a mailbox in Blaine, just across the border, 5 minutes from where we live. I will send you the address. I expect to meet up with Les at the Roche Harbor rendezvous in a couple months and can give it to him then so he will have it if anyone else wants to borrow it. Do we send you $$ for shipping?
Catboat Willy & Pkeyser, I met with the local guy that does soda blasting in the yard. I am stunned to report that he has quoted my a price that is even less than $1600 and in CAD to boot. Amazing. It looks like I will be using my time and energy to fill blister holes and repair/replace gelcoat instead of sanding bottom paint. Wow, I was so confident that it would be far too much $$ that I wasn't even going to ask. Thanks so much for pushing me in the right direction.
I heard back from the previous owner. They did not have the boat shrink wrapped at any point but only owned it for a few years. I will be filling them all and then moving the water line up to cover with anti fouling. I don't like the way the current waterline looks so am fine with moving it up but am more concerned with the possibility for further deterioration.
Thanks again and again for all the help and suggestions. I'm stubborn until a really good idea comes along and happy to change my direction if it makes perfect sense. Maybe that explains why so many people laugh when I say I changed the boat name to Sidetracked.....
sv Sidetracked
1983 C36 MkI #0157
Nanaimo, BC
Be happy to forward the tool, but there's a process. As explained more fully here https://www.catalina36.org/members/toolbox "We'll make these available for loan to C36/375IA members. NO COST -- except to pay the postage both ways, and you need to return the tool so we have them back in the toolbox for the next member to borrow. These tools are in frequent use, so you need to return them promptly so it's available for the next member's use. Sound like there's a catch? No catch. Just pay the postage and return it on time. This is an honor system."
You'll need to fill out the tool request form at
https://www.catalina36.org/members/toolbox/tool-request-form That way the C36 Assocation can keep track of where the tool is and where its going next.
Matthew Chachère
s/v ¡Que Chévere!
(Formerly 1985 C36 MKI #466 tall rig fin keel M25)
2006 Catalina Morgan 440 #30.
Homeported in eastern Long Island, NY
The holes may be there to give the filler a good grip on the keel.
Les & Trish Troyer
Mahalo
Everett, WA
1983 C-36 Hull #0094
C-36 MK 1 Technical Editor.
Commodore
I agree with Les.The lead keels are encapsulated with gel coat. When an area flakes off and exposes the lead. It's almost impossible to get anything to adhere . I did some repair work on a C30 keel and the only way I could get epoxy to stick was by drilling holes at different angles and filling them.
Paul & Wendy Keyser
"First Light"
Rye NH
2005 C36 MKII #2257
Wing, M35B
Cherel;
You mentioned you were going to re-bed the chain plates on your early Catalina 36 and I wanted to share a bit of information regarding the bolts that are used in fastening the chain plate to the deck. You will have a heck of a time finding that exact slot head bolt at the hardware store ; they are 3/8" X 2" -16 thread with a slot head. (See below) . The good news is that they are available from Catalina Direct as part number. D2224 and used to hold the tiller arm in place on a Catalina 22 & 25.
Bill Dolan 1990 Catalina C-36 MKI - Hull #1041 'Williwaw'
Std. Rig, Walk Through, Wing Keel
M35, Oberdorfer Conversion,
Home Waters; Charlotte Harbor & The Gulf Islands of Florida
'You are never out of work if you own a boat'
Thanks all for the helpful info.
I have submitted the tool request form, used my Blaine address as the drop down menu does not give Canada as an option.....
I'm not sure who is planning to rebed their chainplates but it isnt' me. I have over 1000 blisters to deal with now that the hull has been soda blasted. OMG!! I now fully understand the saying "ignorance is bliss". Oh well, looks like our one month on the hard is turning into two. Yes, I realize that this would be a good time to have all the gel coat removed and the bottom completely re-done but we just aren't interested in putting that kind of money into a 1983 sailboat. It has plenty of other issues that need to be addressed. I will fix the ones that I can find and leave the rest for another time. The good news is that the other 1000 blisters were already dealt with by a previous owner......
ps.. I should mention that it was me yesterday that attacked the bigger of the blisters with a chisel. They were mostly just bumps, I popped them for the fun of watching goo ooze out. Also great for stress relase...
sv Sidetracked
1983 C36 MkI #0157
Nanaimo, BC
Suggests continuing the pimple popping party for all of them, and then let them dry out...the longer dry time, the better. You can use a drill, but don't go deep. It would be ideal if the weather were warmer to accomodate drying. Might want to consider using a tarp over the boat to prevent rain from re-wetting the open blisters. When they dry, mix a two part epoxy with thickener and spatula over the holes. Light sand the excess epoxy. Sanding also preps the surface for your epoxy barrier coat. (Cured epoxy will contain a waxy surface that is reduces adhesion to subsequent layers). Use a two part expoxy barrier coat and apply at least 3 coats before the previous ones fully cure. The cure rate is highly dependent on temperature and moisture. I did barrier coating on my 1986 C30 in warm weather and had to roll it on like a madman to prevent full curing prior to the next coat. (I was not smart enough to involve a helper). You can also control the cure rate by the epoxy formulation itself (ie West Marine 105 vs. 205 systems). I based my recomendations on the 1990's West Marine barrier products. There might be some newer, better ones on the market now. Tedious work , but the hull will look great when done.
Paul & Wendy Keyser
"First Light"
Rye NH
2005 C36 MKII #2257
Wing, M35B
Thanks for the support....
I've been grinding blisters all day and it went very well. Got a flapper disk for the small grinder and it worked awesome, much better than the little dremel I tried yesterday. So almost 1000 blisters are now open and well on the way to being dried out. It took a few minutes to get the hang of it but once I figured out how much to take off it was fast and very effective. I didn't get to every little tiny blister, partly because I just can't see them all and partly because I can no longer lift my arms.
I was re-assured to have a number of the professional boat repair guys in the yard stop by to comment and they all said it was not as bad as I might think and I was tackling it the right way. I did grind off some of the old repairs and I found a few that were so poorly repaired that they still had liquid in them and had not been ground down to good fibreglass. Most of them were fine so I am not going to worry about it. It just confirmed that it really is worth taking the time to get rid of any moisture and loose fibreglass.
Anyhow, here's a few pictures of the progress.
sv Sidetracked
1983 C36 MkI #0157
Nanaimo, BC
How did your Bottom Job go?
Thanks for the reminder to update my hull repair job. We are cruising right now so internet is a bit spotty, I will add photos when I get home again.
I spent a good deal of time grinding and cleaning the blisters that I felt like fixing. There are many more small ones that I may or may not care enough to deal with at a later date. The good news is that most of them were quite shallow and I was able to grind them down to clean and solid fibreglass without going too deep. After a few days of grinding and fairing I left them sit for about 6 weeks. Sure, I could have let them sit for the whole summer as suggested in many how-to videos but I actually wanted to get out on the water this year.
After 6 weeks I cleaned them again and filled them with epoxy a few times until I could sand them mostly level with the hull. It is not a perfect job by far but many guys in the boat yard came around to give me their opinions and suggestions and they generally approved of the job I did. This process took a couple of weeks as there is only one of me and many many holes to fill and sand and fill and sand.
Just for fun in the meantime, I ground the keel down to bare metal and removed the original fibreglass and fairing compound that covereed the keel to hull joint. When the keel bolt socket set arrived we tightened up the bolts then coated them inside to keep water from the bilge from draining out through the bolts. The gap was perfectly acceptable to me so all I did was fill it with epoxy filler and a few layers of glass, fill and sand and sand and fill and a little bit more sanding then I was pretty happy with the result.
After the blisters were filled and the keel was looking pretty I gave the entire hull a good sand and cleaning.
Finally, I used Interprotect as a barrier coat and a couple coats of some beautiful black antifouling and the job was done.
I didn't take as many pictures as I should have. Started out with good intentions but it seemed like I had so many pictures that weren't that interesting to anyone but me so I stopped taking them. Will see what I can find and post them in a few days.
sv Sidetracked
1983 C36 MkI #0157
Nanaimo, BC
Thanks for the Update!!!
FYI - I believe there is one keel bolt under the front cabin floor (aka sole).
peter g
2000 C36, MK2, Hull. #1897
wonderful, wonderful, wonderful ! ! !. 5 th Catalina
FYI - I believe there is one keel bolt under the front cabin floor (aka sole).
peter g
2000 C36, MK2, Hull. #1897
wonderful, wonderful, wonderful ! ! !. 5 th Catalina