

Has anyone tried to replace the ice box foot pump? I can't imagine how anyone can get to the thing which is encapsulated by the moulded liner which forms the structure for the galley/ice box area.
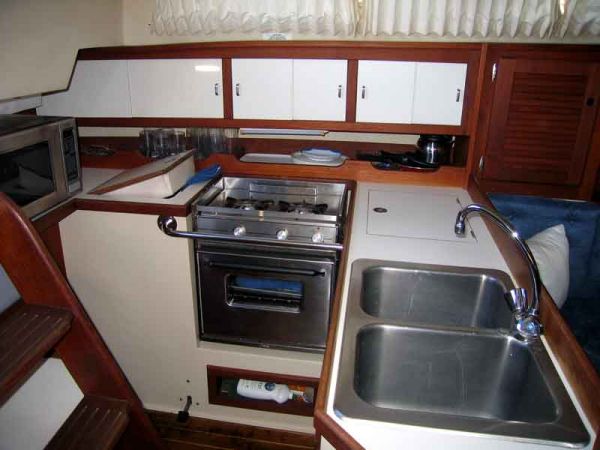
Catalina Yachts have suggested removing the teak "box" below the stove (see picture attached) which is forward of the foot pump. However, removing attached pipes from the pump to extract it from "around the corner" in this way, seems likely to bring on words I don't usually utter in polite company..:mad:
Are there any tricks of the trade to make this relatively painless?
BTW: the reason I need to replace the pump is becuase the plastic encased steel shelving in the ice box has rusted so badly that bits of metal fell down with the melted ice water to enter the pump and deliver it a fatal blow. Catalina Yachts can replace these shelves, but need the measurements from your specific vessel since it seems these were made up to fit on a boat by boat basis.
Triatica (GlennF)
s/v Blown Away
Sammamish, Wa
Hull #971
1989 Catalina 36
Universal M25xpb
Glen:
Catalina Yachts is correct. The only way to access the foot pump is to remove the storage box under the stove. There will be 5 teak plugs with screws behind them that needs to be removed as this was the case on our boat. Then pull out the box. There you have full access to the pump. Hose's came off easy on our pump as each was held on by a screw clamp. Good luck!:)
Randy
Randy Sherwood
Mutualfun 1990 # 1057
T/R W/K M35a
Home. Charlotte, Mi.
Boat. St Augustine,Fl.
Hi Glen:
On our 1989 C36, hull #949 the box only had one screw at each corner. As Randy said, you have to remove the teak plugs to gain access to the screws.
To remove the plugs, drill a 3/32" hole through the center of the plug and screw a #8 or #10 wood screw into the plug. Keep turning the screw in until it bottoms on the screw head inside. Then keep turning to jack the plug out of the hole. You may end up with a part of the plug still blocking access to the screw head, but the teak is easy enough to clean out. The box will slide out once all screws are removed.
Good luck
Tom & Janis Grover
C36 #0949
SR/WK, M25XP
Midland, ON
Glenn,
It is not necessary to pull the box to access the foot pump. You can do it that way, but you can also cut a hole in the side of the plywood frame of the drawer assembly under the galley sink. I used a large hole saw (x4) and a sabre saw to do it. I now only have to take the drawer out, and I have access to the foot pump and also the rear of the water heater. Picture #52 at the following link shows what I did.
[url]http://share.shutterfly.com/action/welcome?sid=1AasmrRk0cMXFg¬ag=1[/url]
Hope this helps.
Tom Sokoloski
C36/375IA Past Commodore
Noank, CT
Tom, your installation may be different from Triatica's. The photo attached to Glenn's post shows the pump located beneath the fridge, which would accessable only via the box opening beneath the stove.
Glenn, once the box has been removed, it shouldn't be too difficult to get the pump out where you can work on it. And the overhaul isn't bad, either...with the O/H kit avail from West Marine. You do have to pay close attention to how things come apart in order to make sure they go back together the same way. Once you have the pump back together, try blowing on ports to validate the valve logic. I actually reassembled mine with the output/input reversed, which I discovered by this validation test. So I just connected the hoses the other way around to accomodate that.
The only concern I would have is whether the "fatal blow" you describe was indeed fatal...that is, whether one of the plastic parts has been irrevocably damaged. Those plastic parts aren't available in the O/H kit.
Larry Brandt
S/V High Flight #2109
Pacific Northwest, PDX-based
2002 C-36 mkII SR/FK M35B
Larry,
You are correct. I didn't look at the picture closely enough. Triatica's foot pump is in a different location from mine. You would have to take the box out to get at his.
Tom Sokoloski
C36/375IA Past Commodore
Noank, CT
You guys are awesome:)... excellent advice and certainly going to help me tackle this job.
Nice to know I'm not blazing a trail here.
Thanks again for all the help.
Triatica (GlennF)
s/v Blown Away
Sammamish, Wa
Hull #971
1989 Catalina 36
Universal M25xpb
Forgot to mention...you're original post said that your metal shelving was rusting. No problem. The shelving is standard, straight forward, metal closet shelving found at Lowe's, Home Depot, The Container Store, etc. Take the old shelf in to make sure you're getting the right stuff. It's not pricey.
When back on the boat, trim the new section with bolt cutters to the right size. It's a little tricky, this part of the job...fitting and cutting, fitting and cutting. If you overcut, then the darn thing won't set properly on the ridges and will become a nuisance. You'll want to get a package of the tiny plastic end covers to keep from scratching the inside of the fridge.
Larry Brandt
S/V High Flight #2109
Pacific Northwest, PDX-based
2002 C-36 mkII SR/FK M35B
Thanks Larry. Certainly likely to cost less than the $32 before shipping from Catalina Yachts.
Regards,
Glenn.
Triatica (GlennF)
s/v Blown Away
Sammamish, Wa
Hull #971
1989 Catalina 36
Universal M25xpb