

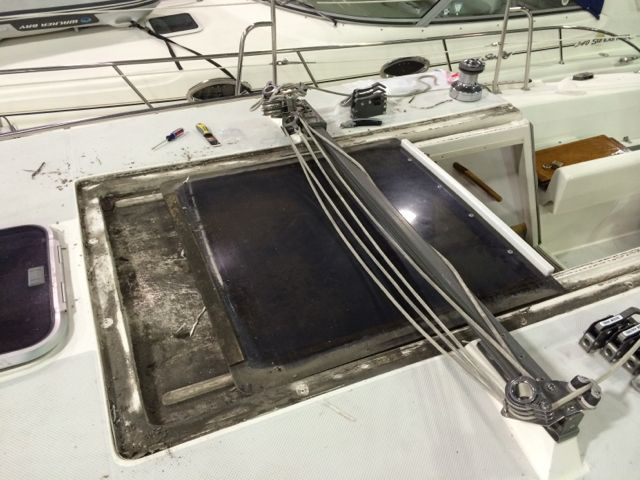
During the summer my boat showed signs of moisture in the forward corners of the companionway hatch hood. I removed it last weekend to determine if the issue was serious. I am assuming that the PO had never removed the hood and the adhesive/sealant was from the factory. It was a pain to cut away and consumed about 3 hours of my morning.
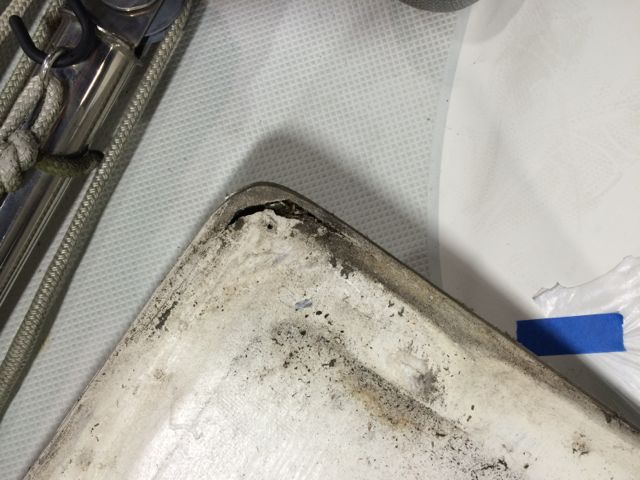
I attached a few pictures showing the dirt/kludge that collected and also that I had fiberglass damage on both forward corners of the hood. As you can see this damaged a bit of the core. I was going to try and attempt the repair to the hood myself, but I have quite a few other items to finish up on the boat before the spring launch so I am having a local glass repair guy take of it.
I am assuming that water was getting through the sealant at the covers or somewhere and cause the fiberglass core issues.
Just wanted to post to provide some insight if others run into the same issue with moisture readings in that area.
The last picture is after my initial cleanup of the area under the hood.
Ralph Rye
1999 C36 MKII - Tall Rig - Fin Keel
Hull#1813
Green Bay, WI
Hi, everyone.
Been meaning to write this up but was waiting till I finished the whole job.
Since norgetek now has the same problem, I'll go ahead with what I have done thus far:
--------------------------------------------------------------
I had pretty much the same problem on my 1984 MK1.
The first pic shows about an inch or so of grey dirt that had accumulated beneath the fixed sliding hatch cover (the hood is it called?). Since neither I nor the PO could get in there to flush it out, it had been accumulating for several years.
As shown in the second pic, when I unscrewed the fixed hood to open it up (PITA since the traveler won't let you remove it all the way...unless you remove the traveler - an even bigger PITA) I discovered that the dirt had been grinding away the fiberglass on the sliding hatch cover, like sandpaper. Yikes! Good thing I caught it before it could grind it down to structural unsoundness. Otherwise I'd be having to rebuild the sliding hatch cover too.
After unscrewing the hood and taking it off, I noticed that Catalina had used simple wood screws for the hood. Yikes! This will cause two problems eventually:
1. Water leaking into the core (as with most deck screws / thru-bolts) and...
2. If the boat suffers a knockdown and a wave or strong wind puts any significant pressure on the underside of the sliding hatch (or maybe even just simple gravity pressure), the sliding hatch will break off, which would obviously be bad in a storm. (Think "All Is Lost" :-))
So, I decided to re-design the whole thing to achieve three results:
1. Strengthen the hood and sliding hatch, so it can't fall off even if the boat rolls 180 degrees, and so that water can never enter into the deck core from the holes.
2. Make the hood easy (or at least easier) to open to clean out accumulated dirt....which I can see WILL happen again over time.
3. Add a smooth-surfaced, soft plastic sacrificial buffer (aka shim, aka washer) between the bottom of the sliding hatch and the deck on which the sliding hatch slides. This will pretty much guarantee that the sliding hatch will now outlive me. The last piece of the puzzle is designing the soft plastic buffer (a long thin piece of plastic I got from a hardware store plus some Teflon tape) so that when the teflon wears away I can easily remove/replace it without having to take the hood off again.
As you can see in the other attached pics, I have drilled and routed out the deck core holes (per Maine Sail's excellent technique) so that the new thru-bolts will only contact epoxy (and not the deck plywood). One pic shows the hardening epoxy with the black gorilla tape covering the hole. Another pic shows the finished hole (on the right) with the thru-bolt in the next hole (on the left).
Another pic shows the plastic buffer strip with the clear Teflon tape on it. You can see that the sliding hatch had worn away all the gel coat where it rubbed on the deck.
Overall crappy design, Catalina. Sorry, but I call 'em like I see 'em.
As I said, I still have to design a way to remove/replace the Teflon-coated plastic buffer strip easily ("easily" meaning without having to remove the hood again), but I think that will be relatively easy to solve. Once I have that designed and implemented, I'll add the rest of the thru-bolts and seal the thing up, probably with the butyl rubber I got from Maine Sail.
For now, the thing is at least "triaged" and is safe enough for bay sailing where there's no chance of negative pressure on the fixed hood / sliding hatch.
P.S. I'm trying to find where I bought the sticky-backed Teflon tape, just so you get something that works well. It's 1 inch wide which fit perfectly on the plastic buffer strip I made to 1 inch width, which fit perfectly into the sliding hatch groove...but I can't find the distributor yet.
Ben Ethridge
Miami, FL
1984 MK1 Hull# 263