

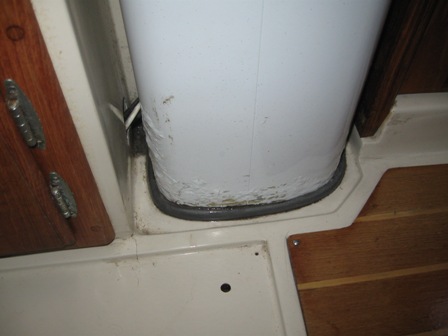
OK, got your attention. I really need the Cat 36 Brain Trust's help, this is driving me crazy. As I posted before, when it rains I get water seemingly coming UP around the mast inside which overflows and soaks the floorboards. We had a bad rain coming, so I re-wrapped the mast boot on the outside with rigging tape to assure it was not leaking there. Got to the boat today and it happened again. Looking at the photo, the water seems to come UP around the outside of the mast and collects in the little reservoir around the base of the mast. It then overflows and soaks the floorboards. I say UP because a) the cushions that hug the mast are bone dry and b)there is a bit of dust on the mast inside the boat which would have washed away or streaked if the water was coming DOWN the mast through the deck. Oh BTW, there was also 1 1/2" of new water in the bilge (it was dry before). After drying the bilge, I went into the little door next to the mast (see photo) and ran a long screwdriver through the limber hole into the mast area to make sure it wasn't plugged up. There is apparently no way to get at the area where the mast sits unless I'm missing something. ALSO, I now notice (see photo) some serious corrosion and paint bubbling on the outside of the mast surface. I have had this sort of corrosion where dissimilar metal is mounted, but never anyplace else. I'm not sure if this was there before and maybe I just didn't notice it. So, a few of my questions are:
1. Is there any way to get at where the mast sits in the bilge without pulling the mast?
2. How the heck does the water rise UP around the mast from the bilge area when the bilge only has 1 1/2" of water in it?
3. Could the mast be blocked inside at the base so that the mast is filling with water which is escaping through the wire access hole (see photo)?
4. What do you think is causing the corrosion?
5. Is my theory completely wrong and this much water came down the groove in the sail track past all the rigging tape and into the boat?
Seriously, this is driving me nuts....ANY suggestions are welcome. So that we don't drift too far afield, mine is a MK I with a standard mast and rigging (no furler).
The (only) good news is that I replaced all my crazed portlight lenses last week and none of them leaked!
Thank you in advance for all suggestions.
[ATTACH]182[/ATTACH]
Deja Vu
1991 MK I # 1106
Marina del Rey, CA
Mike
On my boat the "well" that the mast sits in has a drain hole so water that comes down the inside of the mast can drain into the bilge and not overflow unto the floorboards.
I don't think I get the amount of water you do when it rains but I do get a little seepage at the base where the mast sits on the step.
I have Spartite at the mast partner which seals that area of the mast quite well so any water I do get I think is coming in from the various openings in the mast when the rain is being pushed by the wind.
As for the corrosion, water probably got between the paint and the mast at the base and the corrosion is working its way up.
Bill
s/v Lucky
1984 MK I Hull #266
San Antonio, Texas
Mike,
I agree with Bill. There should be a limber hole in the aft stbd corner of the little well or basin at the base of the mast. You should be able to take a 3/8" drill and drill one aft and outboard from the corner. Make sure any wiring in the bilge is out of the way. Our masts are not water-tight. With internal halyards, you will alwasy have exit plates, and water (rain) will get in them. Somewhere in the Upgrades or Maintenance section of the website is a picture of what the mast step looks like with the mast pulled. Any water inside the mast will flow into the small well, and then it SHOULD flow into the bilge. Also as Bill says, the corrosion is from water getting between the mast and the paint. Unless the mast is sitting in salt water 24/7, the corrosion you see should not be structural. The next time you pull the mast you can clean, prime, and paint that section.
Tom Sokoloski
C36/375IA Past Commodore
Noank, CT
I live in Vancouver - we often get 2+ inches of water in the bilge in less than 24 hours due to water coming down the inside of the mast. My mast boot does not leak. You must have a limber hole in the same compartment as the mast, as described above.
My parents' boat has a similar setup to the Catalina - my dad put a dam in the bottom of the mast about 3" up from the base, using foam. He drilled a hole in the side, and put a hose barb in it. He has a little 1/4" hose running from here into the bilge. This does stop water from sitting in the bottom of the mast where there are dissimilar metals causing corrosion. However I don't think this is altogether necessary as long as you make it easy for water to get from the mast to the bilge, and try to steer it away from any wood while you are at it.
Jason V
Vancouver, BC, Canada
Mike, here are some observations...
[QUOTE=dejavu;3469]
1. Is there any way to get at where the mast sits in the bilge without pulling the mast?
2. How the heck does the water rise UP around the mast from the bilge area when the bilge only has 1 1/2" of water in it?
3. Could the mast be blocked inside at the base so that the mast is filling with water which is escaping through the wire access hole (see photo)?
4. What do you think is causing the corrosion?
5. Is my theory completely wrong and this much water came down the groove in the sail track past all the rigging tape and into the boat?
[ATTACH]182[/ATTACH][/QUOTE]
1. It 'might' be possible to remove the cabinetry just aft/port of the mast to gain better access. On my Mk II with U-shaped dinette, it is easy to remove that unit.
2. Trust me. Well, if not me, then Isaac Newton. Water is NOT coming UP. If it were, then the entire bilge would be flooded to the same level.
3. Yes, I believe it could be possible...at least to the extent that any leakage might be slow. If so, then you might have a fairly large reservoir of trapped water in there. (Don't take this idea unless a qualified person agrees, but if it were my boat, I would be inclined to drill a tiny (1/8") pilot hole near the base of the mast to see what comes out. Somewhere on this site is a photo of the mast step, which I would want to review just to ensure that any pilot drill went through the mast, and not through the casting that the mast fits over.)
4. The corrosion, which I spotted immediately in your photo, is to me the most worrisome part of your problem. I suspect you're in for a stick pull. You're salt-water based, I think. While I can't imagine how salt water might have gotten inside your mast, I do worry that the corrosion might be related to the water trapment problem.
5. Yes, it is possible for that much water to have come down the inside of the mast.
As previously mentioned, there should be a drain hole in the 'basin' that the mast step sets in. And while you're checking limber holes, you need to make sure that the entire length of the bilge allows free running water. This includes not only the limber hole from the mast base aft, but also the limber holes forward of the mast.
In your photo, you see the cabin sole forward of the mast (that goes into the V-berth). Remove that piece of teak/holly laminate and you'll gain access to a small bilge space where your most-forward keel bolt lives. There should be a limber hole running aft from that area. Then there should be another limber hole going forward from that bilge compartment, into the area beneath the V-berth. You should make sure these are open. These limber holes are about 1" diameter.
Larry Brandt
S/V High Flight #2109
Pacific Northwest, PDX-based
2002 C-36 mkII SR/FK M35B
Thank you all for your observations, ideas and concerns. I have made sure that the limber hole aft of the mast step area to the rest of the bilge is clear, so there's no build-up of water there. I will check the forward one as Larry suggested, but since the water moves aft, that probably isn't the problem. I'm becoming more convinced that the water that comes down the inside of the mast is not exiting the mast (or not exiting quickly enough in a heavy rain) and is backing up and coming out through the hole in the mast above cabin sole level where you see the wire exiting in my previous photo. That would explain several things such as why it doesn't happen in a light rain or when hosing down the boat. It might also explain the corrosion.
[COLOR="Red"]Question[/COLOR]: I am ignorant about this since I have never seen a mast step and I need this answered before I go any further. I am working under the assumption that the mast goes through the cabin sole to the keel. Is this correct or is what I'm looking at in my photo actually the bottom of the mast which is then supported from beneath by some sort of wood or compression material? [COLOR="Red"]AND[/COLOR], if the mast goes through the cabin sole in my photo and sits on an area below the cabin sole, then how do I get to that area so that I can drill a hole in the mast to relieve the built-up water?
(Larry, the area aft/to port of the mast in my MK I is non-removable interior liner containing the holding tank. The little door you see in my photo just aft of the mast gives access to the holding tank plumbing. I haven't found the photo you mentioned, I'm not sure how to search for it).
Thank you for the help so far. Please keep your comments coming. I confess to being out of my depth on this since I've never pulled a mast and don't know how all that works.
Deja Vu
1991 MK I # 1106
Marina del Rey, CA
Mike
You're looking at the base of the mast. It doesn't go through the sole to the keel.
Bill
s/v Lucky
1984 MK I Hull #266
San Antonio, Texas
Check out the Maintenance section, under the Technical tab on the C36IA home page. There are two photos of a mast step in John Reimann's excellent article, "Bulkhead Replacement." Just scroll down a short way from the top of the article. In the first photo, you see a cut white wire at the aft-portside corner of the casting. This is where the drain hole to the bilge would be.
This casting is the grey color you see at the base of your mast. Yes, that IS the bottom of the mast you're looking at in your photo. Apparently, Catalina changed their casting at some point in the production. On John Reimann's MK II, it looks like the mast sets IN the casting; in your photo, it appears the mast sets OVER the casting.
As to a stick pull...Your yard has to lift it out with a crane or some other hefty & high machine. You can facilitate the pull in advance by removing the sails, disconnecting all electrical wiring at the base of the mast, opening up the mast boot, removing the boom and vang, securing all running rigging, and loosening all the standing rigging turnbuckles. Don't forget the deck attachment in the salon. Sounds like a helluva lot of work, doesn't it? Well, think of our brethern on the east coast and upper midwest...they have to do this annually!
We're so lucky because our boat stays in the water year round. Maybe some of our east coast Members can chime in here about mast removal and reinstallation.
Larry Brandt
S/V High Flight #2109
Pacific Northwest, PDX-based
2002 C-36 mkII SR/FK M35B
yes, on my (Mark II) boat the mast sits inside of that cast aluminum step.
As for pulling the mast - as a complete novice, never having done it before, I found it not very difficult to prepare the mast for being pulled. One detail: Be sure to treat your turnbuckles on the standing rigging with PB Blaster or some similar product at least 24 hours in advance and then try loosening them before the yard gets to work. Unlessyou have nearly new rigging, these turnbuckles will tend to freeze up, and since you will be paying the yard labor costs per hour, this can add to your expense.
As LCBrandt says, don't forget to diconnect all wiring. On mine, the wires exited at the port side of the mast towards the aft. One set of wires had a plug, but I had to cut the others. It's no problem reconnecting them.
SF Bay
1998 C36
This was the day that we decommissioned Lucky at lake Travis in Austin in preparation for the move to Canyon Lake. Alamo Crane ($300/hr) pulled the stick and then we had to do it all over again at the other end.
I am very glad we do not have to do this every year!;) Guranteed to take years off your life.
Bill
s/v Lucky
1984 MK I Hull #266
San Antonio, Texas
Bill, I LOVE that green pick-up!
Larry Brandt
S/V High Flight #2109
Pacific Northwest, PDX-based
2002 C-36 mkII SR/FK M35B
I have a MKII and our mast step is different, but I can offer some advice. ( am an Mechanical Engineer BTW, just so you don't think you are taking structural advice from an expert in French Romantic Poetry.)
At this point I would see no reason to pull the mast. I do it every year, and believe me, you don't want to do it unless you have to.
Here is what I would suggest. First, look at the illustration of the mast step that Larry suggested. The mast step has a ridge that fits into the interior of the mast extrusion. I can't access the photos at this moment, but I recall that there are gaps in that ridge.
You want to drill a 1/4" hole through your mast at the location of the gap in the mast step ridge , about 1/4" above the visible portion of the mast step.
Pick a hole location that will not allow water to drain out onto the floor.
If my memory is not correct, and there is no gap in the ridge that fits inside the mast, just drill right though the cast ridge mast step. You won't do the ridge on the mast step any harm by drilling a hole through it.
If you want to go through the trouble, you can select a drill size that will allow you to push a piece of flexible tubing into the hole. Then you can direct the draining water anywhere you would like.
Regarding the corrosion, The mast extrusion is very thick and overbuilt. Plus, unless there are dissimilar metals causing electrolytic corrosion, undisturbed aluminum is self healing and will not continue to corrode like steel.
I would take a sharp implement and dig into the corrosion at a few spots to see how deep it is. I suspect the corrosion is superficial, and looks worse than it is because of the paint bubbling.
Dave
Ballena 1995 Mk II #1445
Dave, thank you. It is satisfying to hear an authoritative response. My background is electronics; so an engineer's perspective here is very welcome. If someone could provide a photo of a mast step that is the same style as the one on Mike's boat it would be helpful for all of us to visualize. Can anyone help with this???
Bay zee wae, how did you find out I was moonlighting as Editeur du Technique* on that French Romantic Poetry site? :)
* Is this right? I have no idea.
Larry Brandt
S/V High Flight #2109
Pacific Northwest, PDX-based
2002 C-36 mkII SR/FK M35B
Actually it thin
Dave
Ballena 1995 Mk II #1445
My boat is stored indoors, in northern Michigan and the staff of my marina and I, remove my boat mast annually and of course re-step the mast in the spring.
It's become a pretty straight forward process but I have learned a few things along the that may be helpful to others.
First, Get and use a hard hat when working a crane!
After you remove the turnbuckles for the various stays, put the turnbuckle assembly in a nice new (ish) white cotton tube sock and tape the sock to the wire stay. This keeps the turnbuckles from snaging stuff (did that in 2006) and scratching the topside of the boat. (probably did that)
I have a tall rig mast and the correct place to attach the crane is about 1 foot below the spreader. Watch out for the deck light.
As you begin pulling the mast, be sure to ease all of your mast head electrical wires out of the boat and then put them into the mast to keep them safe for the trip. All of my electrical connections are on quick connect type fixtures so that I can get them apart and back together, quickly.
REMEMBER to remove the deck turnbuckle inside the cabin and then unscrew the attached u-bolt from the mast, sliding it off before you attempt to completely withdraw the mast. The ubolt will not fit through the deck opening without doing serious damage to the opening and your deck. You must also remember to reinstall this ubolt as the mast re-enters the boat in the spring or whenever. This ubolt assembly slides into a track in the mast and cannot be installed if the mast is seated in the base tabernacle. So plan ahead and go slow! I keep a piece of tape on the base of the mast to remind me to install the ubolt.
Plan for what you intend to do with the mast when it's out of the boat. My marina has built for me and several other customers, their own 2, 2x6 wooden cradles on wheels that are carpet covered and they gently lay the mast on/in these cradles.
Pay attention to the roller furling, it can be easily crushed by the weight of the mast (did that in 2007) and will bend if not supported properly. My ground crew ties all the loose ends around the mast to keep them under control, at several points down the length of the mast.
Do not expect to move the mast once it's down and in it's cradle, it is very heavy and resists my best efforts to lift or to turn the mast. The wheeled cradles make moving the mast into storage a simple 1-2 person job.
After that, mast maintenance is a real pleasure.
I'll send along a couple pictures.
Bill Matley
Bill Matley
Duncan Bay Boat Club
Cheboygan, Michigan
Lakes Huron, Michigan,
Canadian North Channel
"Spirit of Aloha" Hull #1252
Here is a picture of the mast base.
Bill Matley
Duncan Bay Boat Club
Cheboygan, Michigan
Lakes Huron, Michigan,
Canadian North Channel
"Spirit of Aloha" Hull #1252
[QUOTE=LCBrandt;3489]Bill, I LOVE that green pick-up![/QUOTE]
That was the rigger's buddy's truck. I had my doubts about both of them but when all was said and done, they did an outstanding job and I would use them again in a heartbeat.
Looking at Bill's operation in Michigan I am impressed, looks first rate all the way. I have seen our marina drop 2 boats (one was a huge houseboat) and one trailer jumped off a hitch (no chains) and rolled backward into a brickwall destroying the lower unit and swim platform of a beautiful Rinker powerboat that had just been relocated here from Florida. To see his operation is pretty cool. Except for the fact that he has to pull the boat and store it for the winter. We have the luxury of using ours year round.
I don't want to hijack Mike's thread, but the photo below was when I finally relaxed after 2 days of tearing the boat apart and then putting it back together. In fact, when this picture was taken, the main and boom were still tied to the deck. I put them on the next morning.
Bill
s/v Lucky
1984 MK I Hull #266
San Antonio, Texas
[QUOTE=wfahey;3483]You're looking at the base of the mast. It doesn't go through the sole to the keel.[/QUOTE]
Thank you Bill for clearing that up and thanks to everyone for their comments and suggestions. For some reason, I always thought that a "keel-stepped mast" sat down through the sole onto "the keel", Silly me. Well, this makes alot of sense. Today I was back down to the boat to check things out further and to put away the center floorboard and rug which were drying out in the cockpit (people will steal ANYTHING, you know). Anyway, I look at (what I now know is) the base of the mast and the little reservoir thingy is again filled with water and has overflowed (this time the floorboard wasn't there). There has been no further rain, so I now know that water is trapped inside the mast at the bottom.
Dave, great idea, I obviously need to tap into the mast and install a drain of some sort. I will check out those photos and figure it out.
[COLOR="Red"]Question # 1[/COLOR] - Realizing that I might see this when I look at those photos, I'm curious what is the normal system provided for draining the inside of the mast. Does the mast step that the extrusion fits onto have openings through to the bilge and mine are just blocked somehow?
[COLOR="Red"]Question # 2[/COLOR] - What do you think about drilling a 1/4" hole down through the fiberglass "reservoir" that surrounds the mast (see my earlier photo)? I was looking at that today and it looks like I can get straight down into the bilge without hitting a stringer. Are there any structural problems with that? I'm thinking of it as a backup drain. The FG seems quite thick in this area and I don't want to crack the liner.:eek:
As for pulling the mast, I am trying to put this off. When I had the boat pulled for the bottom in October, I had the rigging checked and everything is fine. I have some bubbling around some mast fittings and the quote I got got to paint the mast was $ 6,000. I was going to wait a few seasons and then bite the bullet. I figured I would do the mast, re-rig and install radar all at the same time when the mast was down. Just don't want to do that now. So, Dave, I'm going to choose to believe your advice about pulling the mast.:D I will get after that corrosion, though. I think if I clean away the bubbled paint that is currently trapping the moisture, I can keep it drier and hopefully arrest the corrosion. I'll keep you advised on any solutions or fixes.
Oh, and did I mention? You guys are the [COLOR="Red"][B]BEST!![/B][/COLOR]
Thanks
Deja Vu
1991 MK I # 1106
Marina del Rey, CA
Why paint the mast, I am wondering? My mast is raw aluminum from top to bottom. Below deck, it has the vinyl mast cover velcro'ed over it, but that's all. What's wrong with raw aluminum??? It seems that if it were raw aluminum any exterior corrosion would be either less likely or certainly visible.
Incidentally, Mike, re your Question #2...I would bet a goodly sum that there is already a drain hole there, and that it is plugged. Why don't you try probing with, say, a length of fairly stiff wire (like a piece welding rod) and see if you can locate and open it?
Larry Brandt
S/V High Flight #2109
Pacific Northwest, PDX-based
2002 C-36 mkII SR/FK M35B
[QUOTE=William Matley;3499]Here is a picture of the mast base.[/QUOTE]
Bill, your picture is a godsend! Part of my problem in figuring this out has been my ignorance as to how the mast is stepped and what it looks like under the mast. Your picture has cleared that all up, THANKS! However, it looks like that 1" hole in the center of the mast step wants to be drilled out in order to drain water from inside the mast down to the bilge. Am I correct? That would seem to solve my problem, at least. If that hole isn't drilled out, then it would appear that the only possible exit for the water is either to weep out the bottom or wait until it's high enough to exit from the wire access hole (like it's doing on mine). I have checked and there is a stringer both fore and aft of the mast, so there's no way to check that from underneath. I think my best plan is to drill the hole in the bottom of the mast as Dave suggested to give the water a way out. I do think I see some small holes in Bill's photo in the fiberglass area around the step which I will look for and try to unblock if they exist. If they're not there, I come back to my [COLOR="Red"]question[/COLOR]: If I can't find any existing holes, is it OK to drill a 1/4" hole down through the FG in that little well that surrounds the mast (see MY photo) to allow drainage to the bilge?
Larry, I agree. If my mast wasn't already painted I would leave it bare. Much less maintenance. However, I have paint bubbling around several mast fittings and it's getting unsightly. [COLOR="Red"]What do you think about that center hole I mentioned above?[/COLOR] I will try probing as you suggest, however the wires entering the mast pretty much take up all the room in the access hole in the mast.
Thanks Everybody!
Deja Vu
1991 MK I # 1106
Marina del Rey, CA
Mike,
As I mentioned in my last post, I think drilling a hole thru the corner of the "well" is a good idea to drain water from the well into the bilge. On the other hand, I don't think you will gain anything by trying to drill down thru the center of the mast step. I'm pretty sure that the area directly under he mast step is solid. Solid what, I'm not sure, but that area has to withstand thousands of pounds of compression. In very early Catalinas (C30 to be specific), the area below the mast step was wood. Add a wet environment and multiple years, and you end up with rotten wood and a compressed mast step (not good!). Sometime in the mid-late 70's they switched to non-natural material under the mast step, which does not rot. If you want to drain the inside of the mast, you should drill a small (1/4"?) hole thru the extrusion. The hole should be as low as possible, and not go thru the mst step tabs that extend upward. Bill's picture should help you find a spot, but your mast step MIGHT not be the same. From memory, the one on Julandra (1987 #659) is different. Hope this helps.
Tom Sokoloski
C36/375IA Past Commodore
Noank, CT
A picture is truly worth a thousand words indeed. I too thought that maast on omy 2001 was positioned below the sole of the main salon. I willhave to check to see if the little drain holes ared plugged.
I, like Bill am thankful that we live in a clime where we don't have to haul the boat annuall and remove the stick. I endured that routine with my Catalina 25for 20 years and even on a 25 it can be dangerous and expensive. Thanks again for all of your insight into this matter of water draining in through the mast.
Glenn Druhot
Carpe Diem
New Bern, NC
35* 6' 10" N / 77* 2' 30" W
2001 C36, Hull #1965
Std Rig; Wing Keel; M35B
[QUOTE=TomSoko;3508]Mike,
As I mentioned in my last post, I think drilling a hole thru the corner of the "well" is a good idea to drain water from the well into the bilge. On the other hand, I don't think you will gain anything by trying to drill down thru the center of the mast step. I'm pretty sure that the area directly under he mast step is solid. Solid what, I'm not sure, but that area has to withstand thousands of pounds of compression. In very early Catalinas (C30 to be specific), the area below the mast step was wood. Add a wet environment and multiple years, and you end up with rotten wood and a compressed mast step (not good!). Sometime in the mid-late 70's they switched to non-natural material under the mast step, which does not rot. If you want to drain the inside of the mast, you should drill a small (1/4"?) hole thru the extrusion. The hole should be as low as possible, and not go thru the mst step tabs that extend upward. Bill's picture should help you find a spot, [B]but your mast step MIGHT not be the same.[/B] From memory, the one on Julandra (1987 #659) is different. Hope this helps.[/QUOTE]
I was fine right up until that last part.:D Thanks Tom, that makes sense. But, with no hole under the mast step and no hole drilled low on the extrusion, I'm just wondering how Catalina imagined water would ever drain out of the mast.:confused:
Deja Vu
1991 MK I # 1106
Marina del Rey, CA
[QUOTE=TomSoko;3508]Mike,
In very early Catalinas (C30 to be specific), the area below the mast step was wood. Add a wet environment and multiple years, and you end up with rotten wood and a compressed mast step (not good!). Sometime in the mid-late 70's they switched to non-natural material under the mast step, which does not rot.[/QUOTE]
Heads up that I spoke with Kent Nelson, an engineer at Catalina Yachts, and he says that this is wood in MK1 C36's (at least through 1984). I just verified this on my own boat, which has a sinking mast step (not good!). Since this is a relatively big project I'm going to write up a new thread on that: "Sinking (Compressed) Wooden Mast Step" next.
I have attached a picture Kent sent me showing how Catalina designed this.
If you unscrew your forward cabin sole and pull it up, there is a wooden access hole through which you can view the mast step and verify this for yourself...and also check the forward-most keel bolt.
Ben Ethridge
Miami, FL
1984 MK1 Hull# 263
Yep, they can rot!
Our rotted mast step block was compounded when a PO hit a reef or something, actually separating the hull from the floors... :(
Edit: From memory when we fixed this, I sealed the four screws thru the slotted holes, and filled the big hole in the centre with Sika Flex. Then drilled a small hole in the casting to let the water out. A bit hazy on this now, though
S.V. Wind Star
Rob & Margie Kyles: Auckland ,New Zealand
Mk I Hull #105 1983 Std Rig, Std Keel
As Tom mentioned, the earlier boats had wood under the mast step. He mentioned 1984 for your boats. I ended up doing research on our boats and it turns out that they still used wood until mid-1988!
[url]http://c34.org/bbs/index.php/topic,6752.0.html[/url]
The drawing posted may not apply to your boats, I'd follow the instructions described here and the sketch that Ben posted.
Stu Jackson, C34IA Secretary, C34 #224, 1986, SR/FK, M25 engine, Rocna 10 (22#)
Thanks for the pics, Rob. They help me see the area in which I'm about to cut an access hole behind and to starboard of the mast. I was hoping to not have to cut away as much as you did.
Ben Ethridge
Miami, FL
1984 MK1 Hull# 263
You're welcome, Ben. You shouldn't have to do the repairs we did, we had some serious structural issues probably the result of a major 'grounding'...
I was concerned to see the corrosion to the keelbolts though (and the aft one under our fuel tank) as they were worse than any of the ones we could see in the accessible part of the bilge.
S.V. Wind Star
Rob & Margie Kyles: Auckland ,New Zealand
Mk I Hull #105 1983 Std Rig, Std Keel
Hi, Rob.
I notice that you had to do a lot of cutting on the hull liner to get at all the bad parts.
After you finished fixing, how did you re-fiberglass the hull liner sections and the cabin sole, so that (a) it has good structural integrity and (b) looks pleasing to the eye...or does it?
Do you have pics of the completed job?
I ask because I will now need to do something similar to what you did, but on a somewhat smaller scale.
Ben Ethridge
Miami, FL
1984 MK1 Hull# 263
Hi Ben
The boat builder did the work, I just held stuff for him :-)
First he epoxied and screwed blocks under the joints. Then the old bits went back in with epoxy. The joints were vee'd out and filled with 'bog'. Everything got masked off. The a spray painter came in and made it look like new. The colour was slightly different (just an eye match) but not noticeable. We sprayed into corners and edges to make it less obvious... We're really amazed how good it looks after the MESS!
Edit: BTW, we took the chance to fill in some unnecessary holes in the head cabinet, and repainted in there up to the edge.
Not the best photos, nothing much taken of it after. Sorry.
S.V. Wind Star
Rob & Margie Kyles: Auckland ,New Zealand
Mk I Hull #105 1983 Std Rig, Std Keel
Excellent. Thanks, Rob.
Ben Ethridge
Miami, FL
1984 MK1 Hull# 263