
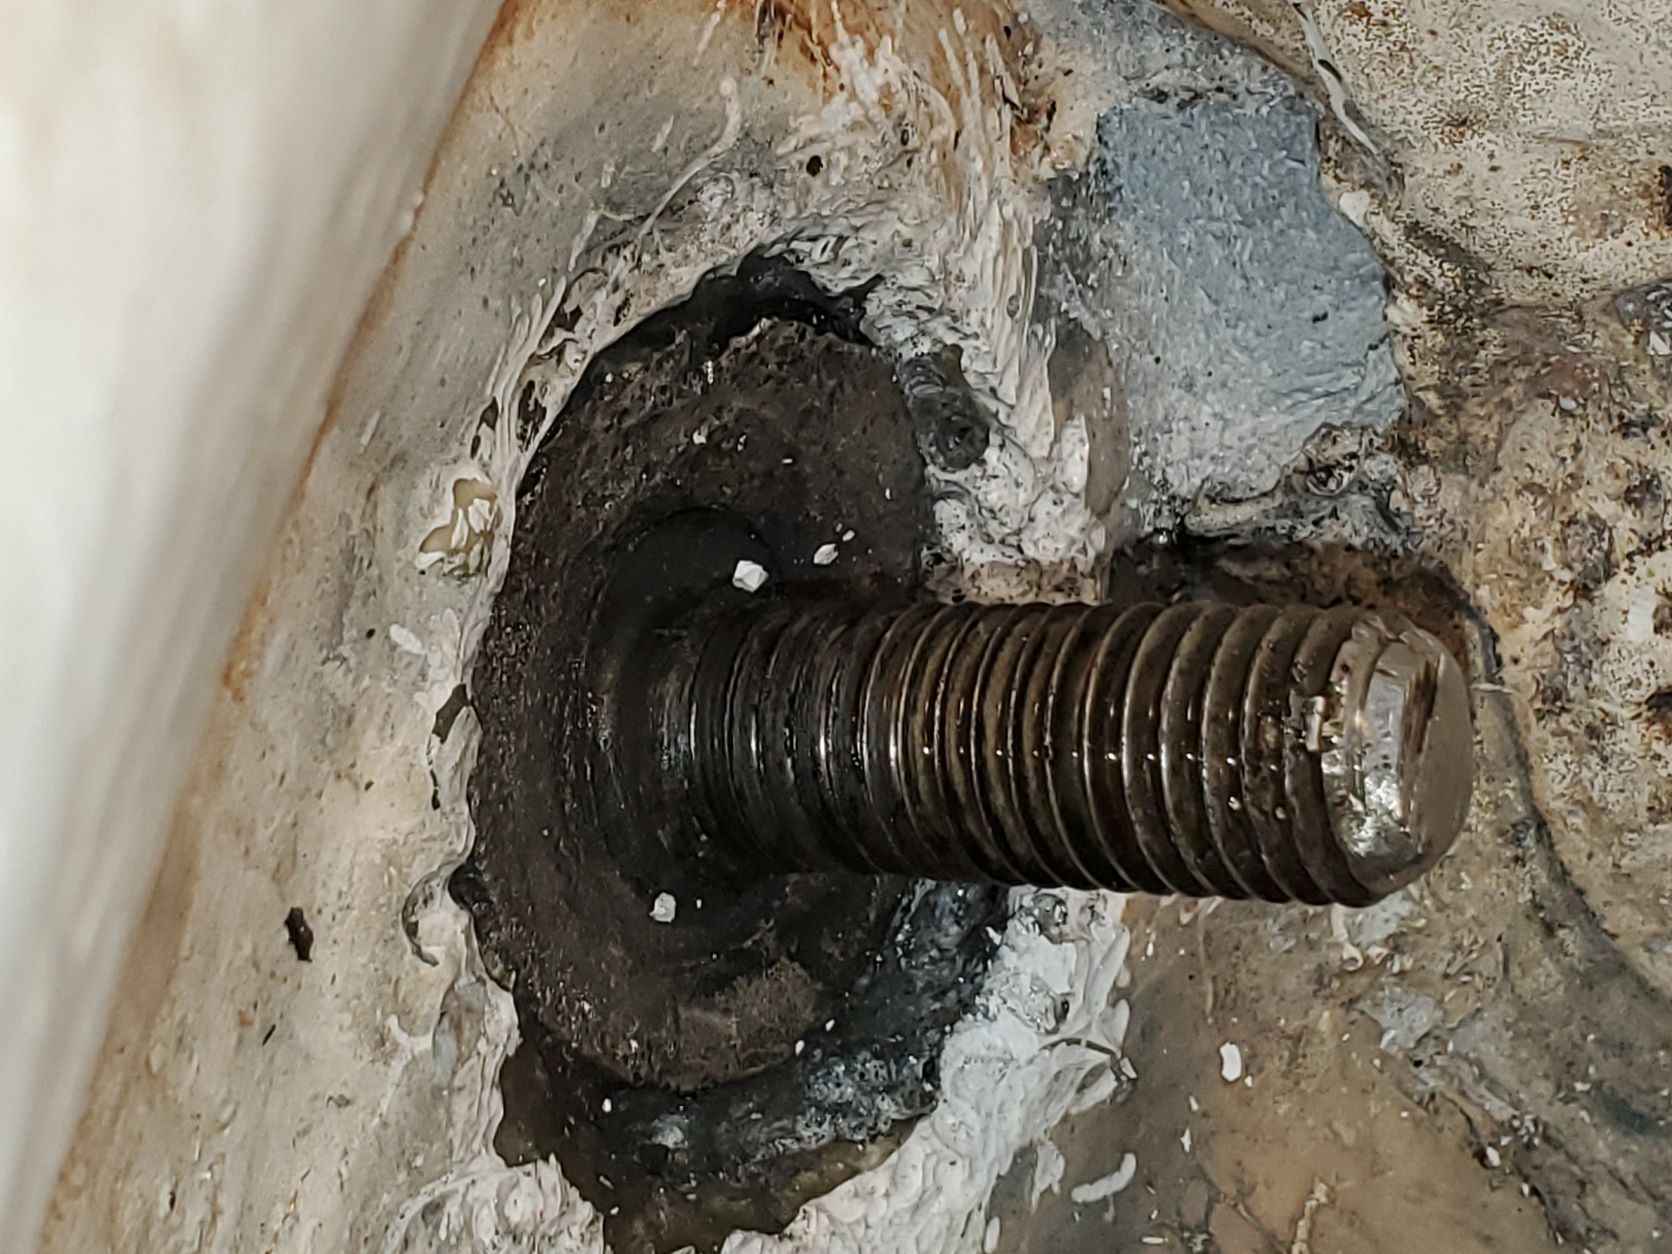
Hi - cleaned up my forward keel bolt. Old nut had disintegrated. May not have been high quality SS. I don't think there is any crevice corrosion happening either. Keel bolt looks ok. Very happy about this.
It looks like someone may have done some repair work around the forward keel bolt before. I can't remove the large washer that is embedded in the built up epoxy. The washer seems to be in ok shape.However, the washer is not level, it has been pulled into a somewhat concave shape and sucked down a little in the center.
Can I leave that washer there?
How should I prepare the area around the keel bolt before I put a new washer and nut on here?
I do not want to have any low spots or places for water to enter.
Can I build up the area with epoxy + woven glass so it is level and then put a nut and washer on it?
Should I put down a lot of 4200 and then bed the washer/nut into that?
Should I call Pacific FIberglass and ask them to come do the repair?
Greg
Catalina 36 tall rig/fin keel #828
Seattle
Has your Keel pulled away from the hull, giving you the " Catalina Smile." Not sure what my boat repair guy would do, but I would use a very large S.S. pan washer ( OD 3" inch ) on this bolt. This would help spread the load. Fastenal has washers available in many sizes, and thicknesses.
Clifford Bassett
s/v " Red Dog "
1984 C-36 Hull # 260
M25 SR/FK
Holland, Michigan
How do you gain sufficient access to that area for servicing the bolt and ensuring torque is correct on the new nut? All I have is an access door directly aft of the mast and amidships of the black water tank. Seems too small to get a torque wrench into.
as for the washer, it seems like you've got plenty of thread to work with so I'd put another washer (or two) of the same size on top to the existing one to achieve level with the surrounding bedding. Then I'd add a wider washer on top or even a SS plate to distribute the load.
Paul Handly
C36 MK1 1985 #440
I had diver take a close look at keel last time the zincs were changed. No visible signs of Catalina smile reported at that time. My boat was made in 1988. Right about the time Catalina stopped using wood in the keel stubs. I hope I do not have a wood keel stub.
The 6 keel bolts in the main bilge are easy to access, inspect, and service. The 2 keel bolts just behind the mast are fair for inspection access. If I had to get a torque wrench on these 2 bolts, it would be challenging.
The single forward keel bolt is hard to access and I think getting the torque wrench on it will be tricky.
The aft keel bolt under the fuel tank was not one of Catalina's better design choices.
I am checking with the factory now for suggestions on the forward keel bolt.
We had an '86 C30 with a keel bolt with this appearance- depressed washer that had taken on a conical shape. The bolt were probably over-torqued by either the factory or PO. (Or there was a void in the wood laminate). They deformed the washer, crushed the fiberglass matt and depressed the wooden keel stub. The boat was about 20 years old at the time. We did have a Catalina smile. Over the winter, I replaced the top marine plywood layer of the stub with a thicker marine grade plywood. I think the keel stub design consisted of two 1/2" marine plywood pieces bonded together with epoxy and covered by fiberglass matting. I used a 3/4" marine plywood replacement for the upper layer. The bolt holes in the stub were about a half inch diameter larger than the bolts. This permitted use of a filler (3M 5200?) to encapsulate the bolt and adjacent wooden surface (which was also sealed with epoxy prior to use of the 3M adhesive). I was concerned that the stub was rotting. In our case, I discovered very little rot and what was there, was confined to the top plywood layer around just one keel bolt, and the screws that held the bilge pump in place. It was a lot of labor to remove the top keel stub top layer and replace it. By the way, this did not fix the Catalina smile, even after beefing up the keel stub thickness.
I suggest drilling some test holes where you suspect rot is occurring. If the wood is wet, you will be able to see that . You will probably find that the rot, if present, is not widespread. Assuming so, let the laminate dry and fill the holes with epoxy, or remove localized rot and replace with epoxy and glass, Be sure to leave space around the keel bolts for 3M adhesive. Replace the washer (s) with oversized ones (Both in thickness and diameter) and torque to 105 ft pounds....or your best guess of 105 ft pounds.
This will save a lot of time compared to a keel stub layer replacement.
Paul & Wendy Keyser
"First Light"
Rye NH
2005 C36 MKII #2257
Wing, M35B