

Hi, everyone.
I am replacing my old, badly-designed (according to Catalina) forestay stem fitting with a new custom one from Catalina.
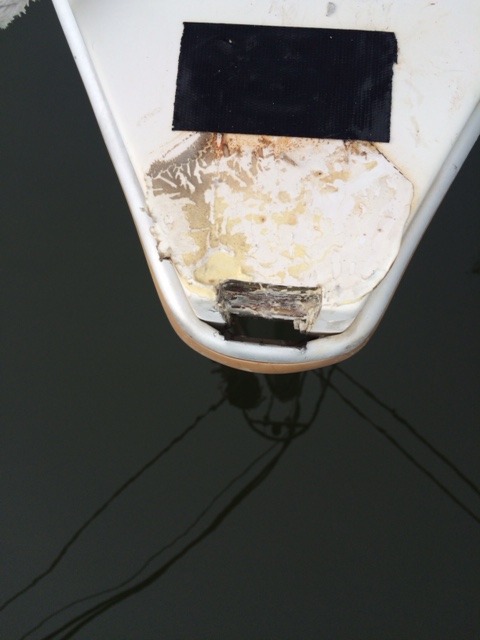
The problem is that the new one is slightly thicker than the old one, and thus won't fit when I try to push it down through the rubrail and its aluminum frame.
I got the old 2-anchor roller one off by banging on it a lot with a hammer, but I really don't want to use that same technique to get the new one in place. It may not even work since, as I said, it's thicker than the old one.
Has anyone done this on an MK1 and how did you get it through the rubrail? Is there maybe a way to take that forward section of the rubrail (and its aluminum frame) off the bow?
I attached some pictures to show the problem, i.e. I can't just push it through the rubrail section.
Ben Ethridge
Miami, FL
1984 MK1 Hull# 263
Can you use a multi-tool to thin the back of the rub rail ? The aluminum is probably old enough that it would crack before stretching.
Was there something that prompted removal of the stem? Some failure indicator we could look for?
Les
Les & Trish Troyer
Mahalo
Everett, WA
1983 C-36 Hull #0094
C-36 MK 1 Technical Editor.
Commodore
There are probably many discussions about this poor design on this forum, and Catalina is suggesting replacement, especially if you see any cracks or rusting in yours. See their pictures at the bottom of this link:
http://www.catalinadirect.com/index.cfm/product/2573_803/stem-fitting-c-320-c-34-c-36.cfm
Mine had a crack in a less critical area, but I decided to replace it anyway, just to be proactive and because the price (see link above) makes it relatively cheap "life insurance". :-)
I'll keep the multitool idea in mind. Thanks.
Still wondering if anyone has actually done this procedure though.
Ben Ethridge
Miami, FL
1984 MK1 Hull# 263
Does this apply to MKII's?
Wally
"Onanne"
2000 MKII, deep keel, tall rig
Lake Champlain
Ben, I have never replaced one, but looking at the images that you have provided, I would remove one side of the rubrail - about 10 feet or up to the next section and peel it away from the hull. This will allow to have the fitting installed. After you have competed the installation then reinstall the rubrail.
I hope that works.
Sail La Vie 1999 Catalina 36 MKII, M35B-17031, Coyote Point, San Mateo, CA
About Sail La Vie
We used a Dremel to file down the aluminum frame, to make the slot bigger. It worked.
Thanks for the suggestions.
Ben Ethridge
Miami, FL
1984 MK1 Hull# 263
Guess I'm going to be inspecting mine when I go to the boat this afternoon.
Phil L
Southern Cross
Channel Islands, CA
C36MKI #400
Hello Ben,
i replaced my stem plate last year. i pulled the rub rail out of its track and downward out of the way and cut a section of the aluminum track wide enough to enable easy installation of the plate. Then I placed the rub rail back into the track and of course there was a gap behind the rub rail because the track had been cut out. Then I put a piece of Saran wrap behind the rub rail and filled it in with Grey Marine Tex and shaped it to match the aluminum track. Also, even though I sent the original plate to Catalina Direct for proper drilling and angles there was a 3/16 gap where the top part of the plate sits on the deck. I filled this gap in with stainless washers where the two bolts go through the deck and sealed it with 4200.
Ken Caldwell
Charleston SC
1994 mk1 #1307
Thanks, Ken.
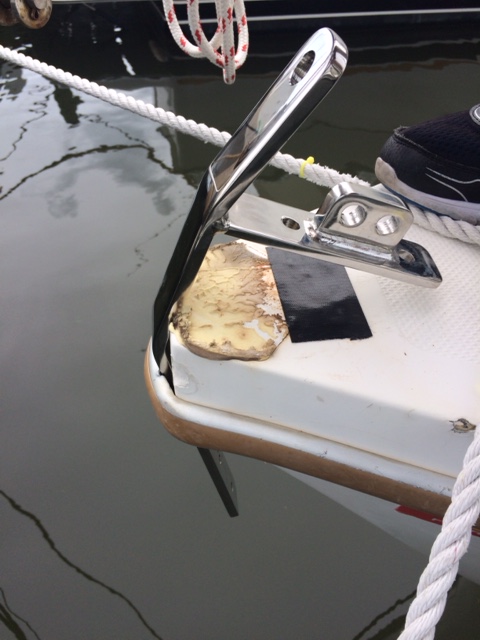
My gap is even worse. It's little over 1/2 inch. See attached picture where I measured it with a ruler. The odd thing is when I compare the new fitting to the old fitting I sent Catalina, it has the same gap! I put the old fitting back on the deck and it has the same problem! In hindsight, I wish I had done that BEFORE I sent it off to Catalina, but (a) it was very hard to get it out in the first place and (b) I would have never suspected this problem.
That makes me wonder if it's intentional, for pre-stressing of the steel maybe? Either that, or over time the old forestay stem fitting simply stressed to different angles from when it was made by Catalina?
Anyway, I'm going to call Catalina next week and ask them what I should do about this. I'll post the answer when I know more.
One possibility which looks like it will solve all the angle problems in the new pictures I attached, is to simply increase the forestay stem fitting angle at the rubrail. I would have to take this to a metal shop, one that works in stainless steel. This (I think) would solve two problems: 1. It would fit flush on the deck like it should and 2. it would close the small gap at the 90 degree angle at the bow shown in picture ForeStayGap1. I worry about weakening the metal by changing this angle a few degrees though.
Ben Ethridge
Miami, FL
1984 MK1 Hull# 263
Ben,
when installing the plate I put 4200 sealant on the bow on the left and right side of the 5 bolt holes and around the holes. Then I bolted the plate on tight and cleaned the excess sealant away. Then I noticed that the stem plate was about an 1/8" away from the bow just behind the rub rail. and I noticed the part of the stem plate that bolts to the top of the deck was above the deck and at a slight angle as you mentioned. I put the aft bolt in and pulled the plate down until it was level with the deck and that's when I measured a 3/16" gap. I paired some stainless washers together that made up the 3/16". Then I removed the one bolt, applied sealant reinstalled the bolts and sandwiched the washers between the underside of the plate and the deck and tightened it. This of course left a 3/16" gap between the plate and the deck but it was level and then I sealed all around the plate with 4200. Remember the forces on the stem plate are pulling upwards and not down.Then I went back to the nose of the boat where the stem plate was about 1/8" away and filled that with a quick set 5200.
Another note: when taking apart the roller furler I marked the threads for tensioning with tape so I would get it back in the same location and hopefully the same tension. but now that the new stem plate appears to be slightly higher 3 /16" and forward 1/8" compared to the original I can't say that it's in the correct position but who's to say what's correct. I do know that my sail looks much better and the furler works smoothly. I hope this helps!
with Kind Regards
Ken
Charleston SC
1994 mk1 #1307
Ben-
Speaking as an old engineer- I can't conceive of a reason to intentionally design a part like this so that it has to be bent to be assembled to the boat. Pre-stressing concrete with internal threaded rod makes engineering sense for bridges, but not "pre stressing" a stem fitting for a boat. Simply put, I think somebody goofed with the design. Interesting that the old and new fittings have the same geometries. I wonder if the fact that they have to be bent into place to fit the shape of the boat contributes to an eventual cracking problem in the first place. It will be interesting to hear what Catalina says.
Paul & Wendy Keyser
"First Light"
Rye NH
2005 C36 MKII #2257
Wing, M35B
Hi, all.
I spoke with Catalina last night. He didn't admit that the original was a design defect on the angle, but then I didn't really push that question anyway. Didn't really matter to me since it was so long ago.
What he did say is that the gap is not a good thing, i.e. it is NOT intentional. He said I should bent the lower obtuse (about 150 degree) angle a bit more. This should make the stem fitting fit perfectly, i.e. fix both the large gap on the deck and the small 1/8 inch gap where vertical bow meets the horizontal deck.. He said that's all Catalina (or their contracted machine shop) did when they made the new stem fitting, i.e. they simply bent it to match the old stem fitting. So I will bend it a wee bit more and the problem is hopefully solved.
I will take it to a local stainless steel machine shop to get this done.
Any advice you can give me about bending stainless steel? I googled it and it just says to do it slowly.
Ben Ethridge
Miami, FL
1984 MK1 Hull# 263
Hi Ben-
It may be too late for this suggestion- but many hardware stores sell 1"x 1/4" aluminum strips. You could cut one to the right length and bend it by hand to mirror the angles on your boat and the shop could use that as a guide to bend the stem fitting to the correct geometry.
I think you have a lot of us checking our stem fittings for cracks. Your boat is 32 years old. Ours is about a third of that and looks fine
Good luck
Paul & Wendy Keyser
"First Light"
Rye NH
2005 C36 MKII #2257
Wing, M35B
Not too late. Great suggestion. Thanks!
Ben Ethridge
Miami, FL
1984 MK1 Hull# 263
Ok - I realize this is an old thread - but I am ordering my replacement Stem now and installing before launch in the Spring. The info here is good and I agree that a new Stem is cheap insurance (bought it through Garhauer). My worry is that I had problems reaching the bolts getting the old Stem off. And I'm not sure I will be able to get the new one on. The access hole in the anchor locker is just large enough to get my arm in but far enough from the bow to make reaching the most forward bolts difficult to remove - and maybe impossible to reinstall. I had to do all my wrenching with several socket extensions and blindly feeling around until I got lucky. Don't think that will work getting the nuts back on the bolts to install the new one. I've considered a fiber optic scope to help me see the area while reaching forward but I haven't figured out how to make my arms longer! Can you access the Stem from the Vberth somehow? Any ideas would be appreciated.
_____________
Harold Baker
S/V Lucky Duck
Duncan Bay Boat Club
Cheboygan Michigan - Lake Huron
1989 C-36 mkI TR/WK M25XP