

This is the thread I was going to post before the electricity to my engine panel went dead. Now that the electricity to my engine panel has been restored via the "reset" button, I can finally post a blurb on my new DIY exhaust riser!
I made it out of black pipe and sprayed it with silver Rustoleum high heat BBQ paint like so many of you before me.
I used 1 1/4" black pipe and 2" x 15' of titanium heat wrap to prevent the noxious smoke that comes from galvanized pipe and fiberglass heat wrap during the initial break-in period. I am happy to report that no smoke came off my exhaust whatsoever. BTW, the titanium heat wrap is not made out of titanium, but it has a beautiful titanium-like sheen, which is how it gets its name. The wrap is actually made out of pulverized volcanic rock...how cool is that?!
I used hose clamps instead of those little heat wrap straps they sell, as hose clamps seemed more secure and are reusable.
For pipe dope I used Real-Tuff with Teflon as per Maine Sail's suggestion. I really caked it into all male and female threads to prevent exhaust fumes from escaping. So far no exhaust fumes have escaped whatsoever.
I included a union on my riser because I read some who claim it makes adjustment/alignment easier. Mine aligned pretty much perfectly, so I guess they were right.
I reused the exhaust flange and and studs, thus saving myself $90 and $30 respectively (not including shipping). I just took all the rust off of them with a wire wheel and they were good to go. As per advice I received reading this site, I was very careful NOT to scratch the mating surface of the exhaust flange while cleaning it up.
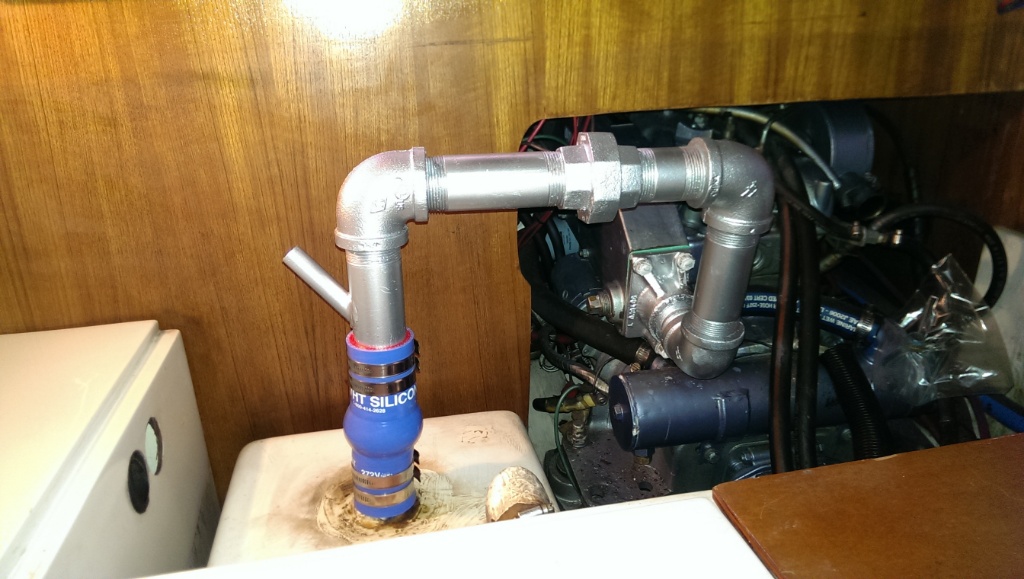
I bought a blue hump hose from Catalina Direct in the hopes of reducing vibration to, and thus extending the life of, my aqualift.
I bought two exhaust flange gaskets as per Stu Jackson's advice. As it turns out I didn't need it, so now I have a spare just in case (or for next time around). Also, I put the gasket on dry because I learned that's how they do it at the factory.
I had to make several trips to various pipe stores because nobody had exactly what I needed. The upshot of course is now I know where all the local pipe stores are located!
I would say the hardest part of the job was removing the exhaust flange from the nipple that connected it to the exhaust riser. It required a vice, lots of rust loosening penetrating spray, a large pipe wrench, and a long pipe to fit over the handle of the pipe wrench to give me leverage. This step alone took hours before the exhaust flange finally budged and began to slowly turn off the nipple it was frozen to. I'm not sure that I would have kept at it until the flange broke free if I had not read accounts of other C36IA members relating similar struggles to get that sucker to break free!
[B]QUESTION: When I hooked up the hoses from the riser injector nipple and heat exchanger to the anti-siphon in the cockpit locker, I couldn't remember which hose went on each side of the anti-siphon. My question is does it even matter which side of the anti-siphon they go on, or is it possible that I put them on wrong? [/B]
PS Almost forgot, I spent about $70.00 on black pipe. The stainless steel prefabricated M-35 exhaust at Catalina Direct costs $400, not including shipping. Big savings!
Joel Schwartz
s/v Get-A-Grip
1993 Catalina 36 Hull #1259
Newport Beach, California
Actually, this is the heat wrap I used. It's the same stuff as the Titanium heat wrap under a different name. If I had to do it all over again, I would have purchased 20' instead of 15', as I came up short and was only able to wrap the riser up to part way down the water injector nipple. But no big deal as that side runs cooler because it is water cooled.
[url]http://www.amazon.com/gp/aw/d/B0051USD80?cache=8712fd5df1ef6754102988537...
Joel Schwartz
s/v Get-A-Grip
1993 Catalina 36 Hull #1259
Newport Beach, California
Thanks for the successful report, Joel. It reads like you are a very good student of others' advice and I'm glad it all worked for you.
Duane Ising - Past Commodore (2011-2012)
s/v Diva Di
1999 Catalina 36 Hull #1777
Std rig; wing keel, M35B, Delta (45#)
Punta Gorda, FL
http://www.sailblogs.com/member/diva-di/
Thanks Duane, it is no exaggeration when I say this website makes me as glad I bought my particular boat as the boat itself. Best hundred dollars I ever spent. Nothing else even comes close.
Joel Schwartz
s/v Get-A-Grip
1993 Catalina 36 Hull #1259
Newport Beach, California
Joel,
It doesn't matter which hose goes on which side of the anti-siphon valve. The purpose of the valve is to contain air and liquids with pressure, and to let air leak in with vacuum, keeping cooling water out of the engine cylinders.
Tom Sokoloski
C36/375IA Past Commodore
Noank, CT
That's a big relief, thanks Tom!
Joel Schwartz
s/v Get-A-Grip
1993 Catalina 36 Hull #1259
Newport Beach, California
I want to thank you for this. I used it for reference in my rebuild.
My flange was so rusted that the bottom bolt was just a dome (see photo), so my wrench could find no purchase, so I had to use a cut off. I was bummed, because I would have to order new studs from Catalina Direct and make another four hour drive to the marina the next week. On a whim, I tried NAPA auto parts, it turns out studs are common, and a whole heck of a lot cheaper than from CD! I too used the union, but things weren't matching up with the black pipe, so I had to buy some galvanized (it's all they had) from the local small town hardware store.
In all my rush to get all the tasks I wanted to get done with a valuable just-dad-no-kids-no-dog-no-wife-work-on-the-boat weekend, I didn't even start the engine! (I still want to replace the fuel filters, and I ran out of time). I guess I'll find out this weekend how much the galvanized stinks.
Hummina
1987 Catalina 36 MKI
#741
Bayfield, WI. Usually.
Joel,
Where did you get the section of pipe with the water injection tube? I am thinking of making new riser as a winter project.
Ron St. Onge
C36 #1384
Ron St. Onge
1995 Catalina 36 MKII Hull 1384
I don't know about Joel, but I got mine at Discount Marine online. Water Injection Nipple (Part #299693)
http://discountmarinesource.com/p-39485-universal-nipple-exhaust-water-i...
Hummina
1987 Catalina 36 MKI
#741
Bayfield, WI. Usually.
[quote=JAS] I would say the hardest part of the job was removing the exhaust flange from the nipple that connected it to the exhaust riser. It required a vice, lots of rust loosening penetrating spray, a large pipe wrench, and a long pipe to fit over the handle of the pipe wrench to give me leverage. This step alone took hours before the exhaust flange finally budged and began to slowly turn off the nipple it was frozen to. I'm not sure that I would have kept at it until the flange broke free if I had not read accounts of other C36IA members relating similar struggles to get that sucker to break free! [/quote]
Last month, during the first week of a month-long summer vacation cruise to Maine, our exhaust riser broke at the elbow by the exhaust flange. Having read the posts here about either the delay in getting a replacement from CD or the arduousness of fabricating one with pipe fittings (and the need for some hefty shop tools), I had serious concern that the vacation was over for now.
As luck would have it, however, we were about 1/2 an hour away from a fabulous boatyard, Eaton's, in Castine, Maine. As soon as I saw the inside of the shop (see picture below), littered with tools and old parts, I knew they could fix anything. The owner, Ken Eaton, was fabulous, we worked together for much of the next day (with breaks so he could launch schooners and so forth) and got the job done by the afternoon, after a 40 mile drive to get plumbing parts.
Anyway, the secret to getting the rusted in pipe elbow out of the flange is the very careful use of a Sawzall on the inside of the elbow (in my instance, a fragment of an elbow); a cut or two just deep enough to allow it to be tapped with a chisel and collapsed inward on itself frees it from the threads on the flange (same with the injection elbow).
Of the 3 items that had worked their way to the top of the list of remaining winter service projects that I hadn't gotten to -- rebuild the head, repack the stuffing box, and replace the exhaust riser -- all 3 managed to fail in the first week of our summer cruise. (At least we didn't get to #4 -- standing rigging). After that, it was all smooth sailing!
Matthew Chachère
s/v ¡Que Chévere!
(Formerly 1985 C36 MKI #466 tall rig fin keel M25)
2006 Catalina Morgan 440 #30.
Homeported in eastern Long Island, NY
[quote=Chachere][quote=JAS] I would say the hardest part of the job was removing the exhaust flange from the nipple that connected it to the exhaust riser. It required a vice, lots of rust loosening penetrating spray, a large pipe wrench, and a long pipe to fit over the handle of the pipe wrench to give me leverage. This step alone took hours before the exhaust flange finally budged and began to slowly turn off the nipple it was frozen to. I'm not sure that I would have kept at it until the flange broke free if I had not read accounts of other C36IA members relating similar struggles to get that sucker to break free! [/quote]
Anyway, the secret to getting the rusted in pipe elbow out of the flange is the very careful use of a Sawzall on the inside of the elbow; a cut or two just deep enough to allow it to be tapped with a chisel and collapsed inward on itself frees it from the threads on the flange (same with the injection elbow).
[/quote]
I'm rebuilding the riser over the winter, this time out of Schedule 80 seamless stainless pipe and fittings.
So I took a couple of pictures to illustrate the technique of cutting some slots into the pipe fitting from inside the exhaust flange. (I only had 1.5 seasons on it and it was still impossible to unscrew). Works like a charm. Once you've made 2 cuts from the inside of the pipe almost -- but not quite -- to the threads of the flange, wedge a screwdriver in the slots and whack it a few times with a hammer. The notched segment will be torn out. Whack the outside of the pipe near the cuts a couple of times to loosen, and it will now unscrew easily.
Matthew Chachère
s/v ¡Que Chévere!
(Formerly 1985 C36 MKI #466 tall rig fin keel M25)
2006 Catalina Morgan 440 #30.
Homeported in eastern Long Island, NY
[quote=Chachere]
I'm rebuilding the riser over the winter, this time out of Schedule 80 seamless stainless pipe and fittings..... [/quote]
Here are some pictures of the assembled replacement, fabricated from schedule 80 seamless stainless pipe (not galvanized). Stainless seamless schedule 80 pipe is tricky to find at your average plumbing supply or big box hardware store, but Grainger's has it and can be purchased online or delivered to their store. Last picture shows it after wrapped first with fibreglass heat insulation tape and then metal tape.
Matthew Chachère
s/v ¡Que Chévere!
(Formerly 1985 C36 MKI #466 tall rig fin keel M25)
2006 Catalina Morgan 440 #30.
Homeported in eastern Long Island, NY
I did a similar rebuild with galvanized pipe from Lowes in October 2013. I salvaged the flange, but the rest of the pipe was new. The problem is that now, just over a year later, the pipe has rusted through completely, and broke off at the nipple. Has anyone else had this problem?
Brett Sayers
S/V Tide Roller
Honolulu, HI
Brett-
I think Galvanized Pipe and Black Pipe may have different metallurgical compositions. A few years back, I did the riser on my Catalina 30, Universal M 25 engine. I did a lot of research and wish I had saved it. I used Black Pipe made in the USA (confirmed by the plumbing store I purchased it from) after I found some articles noting that a lot of Black Pipe was imported from China and had voids and other defects. Diesel exhaust is very corrosive hence that's why most OEM risers are Stainless Steel. That said, the OEM riser I replaced was 20 year old black pipe with 800 hours of run time.
Paul & Wendy Keyser
"First Light"
Rye NH
2005 C36 MKII #2257
Wing, M35B
Thanks Paul, or Wendy. I will look into black pipe.
Brett Sayers
S/V Tide Roller
Honolulu, HI
I have been doing a little Black Iron homework and found the following:
A 1 1/4 x 2 inch nipple:
Schedule 40 Wall thickness .140 Cost $2.25
Schedule 80 Wall thickness .191 Cost $ 4.38
Schedule 160 Wall thickness .250 Cost $15.80
There is also a choice between seamless and welded pipe.
If I was to build something, I think I would use Schedule 80 seamless and maybe where I welded in the water inlet use Schedule 160?
Just my 2 cents
Chuck Lennox
97 MKii Ventura Ca
Island Girl Hull #1611
Ok. I'm going to say this. I spent the money for the 316 stainless welded riser with the thermal jacket and some other small parts. The total with shipping to Hawaii was less than$600. The time I spent fitting the old riser to meet the size last year vs simple order and install was well worth it. The new riser should not need replacing for many years and I must say it was an experience I'd rather repeat then guessing on metals, wondering if they will work and hoping not to replay my experience again in a year or slightly more.
I did also set up a fresh water flushing valve that will work as a flooding pump if needed. The connection allows me to plug a hose into the intake and either put it in a bucket or pressurize from the dock. I can also turn one valve to use the engine as a great bilge pump in an emergency.
All ls in all I believe it is worth the cost to have the right part made for the boat. I will update in a year to let you know how the pipe is holding up.
Brett Sayers
S/V Tide Roller
Honolulu, HI
Brett,
If you want to give you new SS exhaust riser a better chance of surviving multiple years, you might want to consider replacing the stiff black exhaust hose (between the riser and the muffler) with a blue silicone "hump" hose. They absorb most of the engine's vibration, and cause less stress for both the exhaust riser and the muffler. You can get them from Catalina Direct. Just a thought.
Tom Sokoloski
C36/375IA Past Commodore
Noank, CT
I wonder what the weight difference is between the CD stainless riser and building one from schedule 80 black iron or SS pipe?
On my M-30 there is only 3 three bolts holding the pipe. I think this is a lousy design. I already had a gasket leak there once.
I think the m-35 has four bolts?
I think the less weight and the blue hump hose might be worth the money?
Tom's right, the blue hose is a great improvement! I swear I can see and feel a improvement . You know it's saving the muffler. I hope it taking the strain off the three bolts.
Chuck Lennox
97 MKii Ventura Ca
Island Girl Hull #1611
Greetings,
I've read this great "Exhaust Riser Rebuild" thread with much interest. Thank you to the contributors for all your input/advice. I too need to replace mine on my C36- 2003 year #2164, not that it is leaking, but merely as preventative maintenance. My riser is the original, with about 1500 hours on the engine. I suppose it's prudent to replace? What is the original factory riser made of? Threaded pipe, stainless welded steel?
THanks for any advice, thoughts.
Steven Jones, Seal Beach, CA
Steven Jones
C36/375IA FaceBook group administrator
C36/375IA Jib Sheet Editor 2012
Seal Beach, CA, USA
C36 #2164 Maléna 2003 Mk-II SRig/FullK, Long Beach, CA
stevenjones21@gmail.com
[quote=Stevenjones]Greetings,
Threaded pipe, stainless welded steel?
[/quote]
If you do go with rebuilding using threaded pipe, it can be a little tricky to find the heavier gauges of pipe and fittings at your average local plumbing supply or big box store, most of which only carry schedule 40 welded pipe.
I found all the pipe fittings and pipe available at Grainger, where they can supply you with schedule 80 seamless pipe (either black or stainless). (If not in stock, Grainger will ship for free to the nearest store for pickup, or can ship directly)
Matthew Chachère
s/v ¡Que Chévere!
(Formerly 1985 C36 MKI #466 tall rig fin keel M25)
2006 Catalina Morgan 440 #30.
Homeported in eastern Long Island, NY
The original riser on the post 90's boats is stainless steel, but the suspect area is where the water inject port is welded to the main exhaust pipe. I noticed that the newer Catalina Direct riser's welds are a bit smoother and this "inject pipe" does not protrude as far into the riser pipe as the originals...
My install went well and all seems good now (although I've only run the engine a short time).
Also had the Heat exchanger off and cleaned while I was at it...
H
---- Howard & Linda Matwick ----
--- S/V "Silhouette" - Nanaimo, BC ----
--- 1999 C36 MkII #1776 M35BC ---
I own hull 1897, 2000 model, with m-35B engine. Recently developed leak on top of water muffler. I suspect leak is in the blue hump connector. I cleaned the tank top surrounding area adjacent to lowest clamp with alcohol and wire brush - wiping away some dried mineral deposits and could occasionally see a water bubble form while running motor. My gut feel is the hump hose has a slight crack in it and should be replaced.
1) What is the size of the replacement hump hose blue connector? I don’t want to cut out the original connector with out having replacement on hand.
2) Will I have to remove the metal insulated connector tube coming out of the engine to slide the hump connector ?
(The 15 page article on this subject in the C36 Facebook page is very well done)
Thanks in advance for your hints.
peter g
2000 C36, MK2, Hull. #1897
wonderful, wonderful, wonderful ! ! !. 5 th Catalina
Pete -
As to #1, my advice is to measure the existing connections with a caliper. Unless its a fairly new boat -- and I would not consider a 19 year old C36 "fairly new" (no disrepect intended, since ours is 34 years) -- there is a significant chance that the exhaust components have been replaced at some point in the past and are no longer factory original, and as a result the diameter of one or both ends of the hose connections may not be what the collective consensus here would advise you. Found this out the hard way the first time I tried to replace the hump hose with the "standard" replacement from Catalina direct!
As to #2, a definite maybe. From my experience from having to futz around with the exhaust riser and hose a few times, there is probably enough give in the engine mounts to lever up the motor a tad to slip a new hose in. But in case there is not, you should also have on hand a replacement gasket for the flange connection between the exhaust riser and the exhaust manifold. Its held on by 3 bolts (at least on our M25), they may take a bit of pursuasion to loosen at first. You'll need to drain and replace the antifreeze if you do this.
Matthew Chachère
s/v ¡Que Chévere!
(Formerly 1985 C36 MKI #466 tall rig fin keel M25)
2006 Catalina Morgan 440 #30.
Homeported in eastern Long Island, NY
Peter,
If I had to make a guess, without seeing any of the parts, I would guess that the silicone hump hose would be the last thing in the exhause system to leak. The most fragile part of the system is the fiberglass nipple that comes out of the waterlift muffler. The next most fragile part is the water injection nipple above the muffler. And I agree with Matthew, measure everything. There is only a very slight chance that your exhaust system is original. Hope this helps.
Tom Soko
former C36 Julandra #659 owner
Tom Sokoloski
C36/375IA Past Commodore
Noank, CT
Tom, Matt and everyone else -Thanks all for your comments. Please confirm:
Fiberglass nipple coming out of the water muffler is what the blue hump connector slides on to.
Tom, you state: Fiberglass nipple coming out of the water muffler and water injection nipple are most likely source of crack. Has anyone and probably tried fixing with epoxy (3M scotch-weld DP420), marinetex or ?...
To properly measure diameter of nipple, I have to release the four stainless clamps on the hump connector and try prying up hump connector? How to do this with out totally destroying the existing hump connector and by not having a replacement at hand shutting down my sailing for the rest short Wisconsin sailing season.
peter g
2000 C36, MK2, Hull. #1897
wonderful, wonderful, wonderful ! ! !. 5 th Catalina
Peter,
Yes, the fiberglass nipple coming out of the top of the aqua-lift muffler is what the blue silicone hump hose attaches to. The silicone rubber is much more flexible than the thick black exhaust hose that was originally in its place. You might find that you can "peel" the blue hose back to make repairs. I have heard of others using different compounds to attempt fixes to the nipples, but I can't remember if they were sucessful or not. Maybe others can chime in? Possibly you can take off the 4 hose clamps, and gently pry the hump hose away from the pipe and put in a few drops of dish soap. Repeat until the blue hose can rotate/slide on the exhaust pipe. As long as you don't cut the blue hose, you shouldn't have a problem. As someone also said above, maybe you can disconnect the exhaust flange from the exhaust manifold, which would enable you to move the exhaust pipes up and out of the way. Just a thought.
Tom Sokoloski
C36/375IA Past Commodore
Noank, CT
See two pictures. Riser pipe is stainless steel. There is no drip evidence of water at the water injection tube (6-8” above tank). When engine was running I was able to spot a few intermittent bubbles where there black sharpie mark by the tube coming out of the tank.
I will buy a measuring caliper and probably order a new hump connector.
Larry Brandt-please also give us your opinions.
Thoughts? And many thanks.
peter g
2000 C36, MK2, Hull. #1897
wonderful, wonderful, wonderful ! ! !. 5 th Catalina
Peter -
I don't think you'll need to remove the hump hose to measure -- the size of the fittings it attaches to are generally sized in 1/4 inch increments, so you'll get a reasonable approximation of it by measuring on the outside, and just deducting a little for the thickness of the hose.
The hump hose itself is somewhat "stretchy" and can accomodate a slight oversize. If you scroll up to reply #12 above in this thread, the third picture shows the hump hose attached to the old water injection elbow that I USED to have, which was nominally 1-1/2", when the standard hump hose from Catalina direct is for nominal 1 1/4" fittings. Alas, I only discovered this after I had removed the old hose to upgrade to the hump hose, but being in the predicament that I wanted to put my engine back together and go sailing rather than wait for a new hose, I was nonetheless able to stretch it to fit, with the aid of a lot of dish soap. (I later replaced the injection elbow with a new one that was sized at 1-1/4" -- this, of course, is why I suggested measuring before ordering!)
Do keep in mind that the "nominal" size of pipe fittings is not the actual size. The outer diameter ("OD") of what the trade calls 1-1/4" pipe is actually 1.66" OD, and what is referred to as 1-1/2" pipe is actually 1.9" OD. (Its confusing, but if you've done any carpentry you've no doubt familiar with the concept of nominal sizes -- e.g., a so-called 2x4 is actually 1.5"x3.5", and so on...)
I strongly suspect that most --- but not all --exhaust riser components found on our boats are 1-1/4" nominal size (again, actual OD being 1.66"). So, guessing that the thickness of the wall of the hump hose is maybe 1/8", double that figure to 1/4" (for the 2 sides), i.e. 0.25", and subtract it from your outside measurement. So, if, for example, you obtain an outside measurement on the hose of something ike 1.9", after subtracting 0.25 you'd end up at 1.65", which would mean you have nominal 1-1/4" fittings.
Matthew Chachère
s/v ¡Que Chévere!
(Formerly 1985 C36 MKI #466 tall rig fin keel M25)
2006 Catalina Morgan 440 #30.
Homeported in eastern Long Island, NY
Peter and Matthew,
I agree with everything said, but the hump hose might be measured by ID, not OD.
Tom Sokoloski
C36/375IA Past Commodore
Noank, CT
Quite true. If you can figure out what the OD of the pipe fitting the hose is attached to, you'll then know the ID of the hose -- e.g., a hose with an ID sized to fit a 1&1/4" pipe should have an ID of 1.66"( more or less.)
But Tom is correct that the hose is sold by ID. Catalina Direct sells several sized hump hoses, described on its website as 1-5/8"I.D X 6 , 1-5/8 I.D.x8, and 2"IDx 6. 1-5/8 ID translates to 1.625 -- pretty close to 1.66. 2"ID would probably closely fit a nominal 1-1/2" pipe size (which is actually 1.9 OD).
Yes, it does get a bit confusing (at least we don't have to factor in a metric conversion in this particular discussion)!
Matthew Chachère
s/v ¡Que Chévere!
(Formerly 1985 C36 MKI #466 tall rig fin keel M25)
2006 Catalina Morgan 440 #30.
Homeported in eastern Long Island, NY
I ground down the crack in the intake of my muffler and reglassed the nipple to the muffler. Still folding after 2 years.
Les & Trish Troyer
Mahalo
Everett, WA
1983 C-36 Hull #0094
C-36 MK 1 Technical Editor.
Commodore
Might be getting lucky-first try the easy way.
- I suspect leak is a small crack on top of tank near nipple (see picture post 28 with sharpie marks)
-,with others assistance on the forum I built up my courage... and have attempted to fix myself
-,loosened four stainless clamps and EASILY twisted blue hump connector, raising about 1/4" up above tank
- cleaned top of tank 360 degrees around tank top nipple where hump connector connects: used wire brush, sand paper & alcohol to scruff up and clean the area.
- used painters tape (blue & green) to mask off area 1/2" around nipple, and under side of hump connector ( surface parallel is to tank top)
- mixed High temp (550 degrees) JB weld epoxy, applied layer twice. 2 days apart.
- re tightened four clamps, removing blue green masking tape
- did two ten minute runs & no leaks so far.
crossing my fingers fix is complete
.
peter g
2000 C36, MK2, Hull. #1897
wonderful, wonderful, wonderful ! ! !. 5 th Catalina