

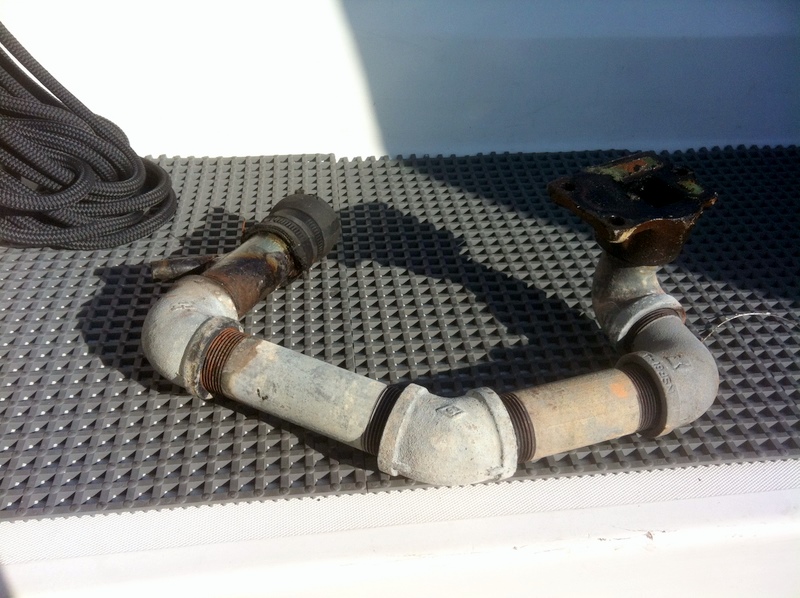
After discovering my exhaust riser was starting to leak (and the PO made the previous riser out of galvanized pipe) I put all of the pieces together with 1 1/4" black iron pipe using most of the ideas posted on our site. I took plenty of photos if there is an interest. I have attached a few for your viewing. I purchased the black pipe at my local plumbing outlet. I even used the union that Ben Ethridge thought of. The union made the installation a much easier project. With the engine side of the exhaust riser installed the union made the second half connection to the muffler without incident. In the far future the union should make rebuilding the muffler/injector side a snap. And...I used copious amounts of the high temp copper silicone to seal the threads to prevent any possible exhaust gas leak. I ordered the 2" hump hose and exhaust flange gasket from Catalina Direct. I purchased the exhaust fiberglass titanium wrap from O'Rileys (the Old Kragens Auto). 15' seemed to be the perfect length to wrap the new riser. I wrapped it twice for double the insulation. I found out West Marine as well as my local suppliers were completely out of the wrap. WM wasn't scheduled to receive their shipment until sometime in mid February? My local shops had no idea when they were going to receive their shipments...thus O'Rileys. I took an 8" X 1 1/4" and a 6" X 1/2" nipple to a local muffler shop and had him weld the injector. $45.00 later the job was done. (Prior to the injector pipe being installed permanently I measured twice and then cut the end to fit the muffler and hump hose.) I returned home with all of the pieces. I loosely put the unit together and gave all of the pieces a good coat of high temp BBQ paint. I went to Home Depot looking for the copper High Temp BBQ paint. Evidently this store and maybe the rest of the Home Depot's don't carry it anymore. Prior to installing the unit I took several measurements from the center of the exhaust flange to the center of the muffler. It just so happened to be 12" exact. When I purchased the pipe I made sure the pieces made the unit a little over 12" taking into account the shrinkage when you tighten up the threads. As surprising as it might seem, and this rarely happens, when I installed the unit the vertical pipe that dropped down on the muffler was right on. Some problems I encountered. I found I had to assemble the unit from the installed muffler flange out due to the fiberglass seat unit directly towards the stern from the engine getting in the way. There was not enough room to slip the flange, nipple and 90' elbow on at the same time. If I had only had an extra inch. If and when it becomes necessary to remove the unit from the engine I will either cut the nipple and rebuild that portion of the exhaust riser or cut a small chunk our of the fiberglass. A possible solution is to use a 90' elbow that has MIP on one end and FIP on the other. The PO had used this elbow on his install. Secondly I tried to dry fit the 2" hump hose prior to the install. It slipped on the 1 1/4" pipe like a glove, not so on the muffler. I solved the problem with a little dish washing soap. With a little work the hump hose stretched and fit over the muffler. And finally removing the exhaust flange from the old riser. I found heating the flange and then using a very large plumbers wrench and a brass hammer worked best. After numerous blows on the wrench handle the flange gave way 1/8" at a time. After a little work the flange broke free. Suggestion... after the install take the boat out for sea trials by yourself. The black iron pipe, silicon seal, and wrap all combined when heated makes a great offensive burning smell. With all of the windows and hatches open I motored from Alameda over to SF and had lunch. By the time I got back to Alameda the smell was gone.
Chris Stewart
S/V "24~7"
1984 Catalina 36 Tall
Hull #251 M25
(SF Bay) Alameda, CA
Chris,
Nice tidy installation, I do like the idea of the union to ease alignment. Yours is a much staighter run than mine which has a verticle rise from the engine to the mixing elbow. Yours has a fairly straight run from the muffler to the engine and may allow water from the muffler to flow back to the engine when heeled heavily to starboard on a port tack, the muffler always has a gallon or so that remains in it. The standard system acts like a P trap to prevent water from getting back to the engine.
I may also have another concern about your water injection elbow being so close to the muffler, typicly it would be much closer to the engine to allow the injected water to cool the exhaust prior to reaching the fiberglass muffler and to keep the temprature down on the exhaust plumbing/manifold. My guess is your installation will turn your aft cabin into a sauna when motoring. Not sure if that would be a feature or a hazard.
Sorry to caste dispersions on the installation, it may work OK but felt I should mention my concern. Hopefully others may have input that dispells these concerns, I think that is what this forum is all about.
Steve
Cepheus dream
C36 MK I # 825
MK I Tech Editor No Mas
Steve,
Thanks for giving me your opinion. That was a concern I also had. I did a lot of research on the issue. Attached is a snip of the Catalina Direct M25 SS Exhaust Riser. I tried to make as close of a copy of Catalina's SS Exhaust Riser. Also as you can see the injector on their SS model is close to the end of the pipe where it attaches to the hump or exhaust hose. Mine's about the same location.
I did run my engine for over two hours on my trip to and from San Francisco at 3000 RPM and a little above. Everything below the hump hose was cool to the touch and there did not seem to be any steam exiting the rear exhaust/water port at the back of the boat. The only thing that I did note was my water temp gauge went from 160 to 162 degrees.
There is a short article in Catalina Direct website in the their muffler section regarding the muffler and how it's design helps prevent the flow of water back into the engine. The article suggests an aftermarket muffler led to this exact problem which was solved by replacing the muffler with the Catalina Muffler.
I'd like to see a photo of your exhaust riser or other member's exhaust riser's to see if this is going to be a real problem.
Thanks,
Chris
Chris Stewart
S/V "24~7"
1984 Catalina 36 Tall
Hull #251 M25
(SF Bay) Alameda, CA
Our boat has the water injection right above the muffler, pretty sure it's the stock Catalina setup as from the factory, it looks exactly like the one Chris pictured except it is wrapped in cloth tape. The tape looks fine and it shows no sign of excessive heat. It gets warm in the aft but not more than I would expect for having about 500 lbs of metal at 165 degrees F sitting in there!
This why our forum is so good. My comments were made with my narrow point of view based on my boats system.
A broader perspective adds to all of our knowledge.
Cepheus dream
C36 MK I # 825
MK I Tech Editor No Mas
Steve,
Thanks again for your input. After your original post I had to do some more research to make sure I wasn't too far off from the correct design.
I found three more photos. One photo from one of our members Julandra, one from our 2008 January Jib Sheet and the last one from reality check. All are similar in design to my exhaust riser.
I'm hoping I am on the right track. It appears, given the photos and info on the Aqua Lift Muffler, this should work with our M25 system.
Chris
Chris Stewart
S/V "24~7"
1984 Catalina 36 Tall
Hull #251 M25
(SF Bay) Alameda, CA
Chris,
We all learn here, our exhaust systems have a finite life, when I redo mine when it's time comes, I will be copying yours as it is a much cleaner installation.
Cepheus dream
C36 MK I # 825
MK I Tech Editor No Mas
[QUOTE=chs1517;11473]Steve,
Thanks again for your input. After your original post I had to do some more research to make sure I wasn't too far off from the correct design.
I found three more photos. One photo from one of our members Julandra, one from our 2008 January Jib Sheet and the last one from reality check. All are similar in design to my exhaust riser.
I'm hoping I am on the right track. It appears, given the photos and info on the Aqua Lift Muffler, this should work with our M25 system.
Chris[/QUOTE]
Chris,
You really ought to do the alternator bracket upgrade before you break the bracket or your timing gear case. I am always amazed to see these motors still working with the old brackets.
Also when making these exhaust systems you want to ask for sched 80 black pipe. I have seen two sched 40 systems fracture. That is a lot of weight and a lot of vibration and sched 40 may not handle it in all situations. Sched 40 pipe and fittings are now showing up from off-shore sources causing other issues. If you can find US made Ward fittings you'll have rugged stuff.
-Maine Sail
https://www.marinehowto.com/
[QUOTE=Maine Sail;11485]Chris,
You really ought to do the alternator bracket upgrade before you break the bracket or your timing gear case. I am always amazed to see these motors still working with the old brackets.[/QUOTE]
Chris -
This is VERY important. VERY!!!
My bracket broke in 1999, and we have developed a "Critical Upgrades" page, similar to your tech notes here. It includes many engine related issues.
Give it a read and click on the links. It has many M25 engine related issues.
[url]http://c34.org/bbs/index.php/topic,5078.0.html[/url]
I may have linked you to this sometime earlier.
The access to your engine is far superior to ours, so it should be an easy fix.
It can fail catastrophically - it's a casting.
It happened to me, which is why I wrote the article(s) and set up the links. Don't let it happen to you. Please.
Stu Jackson, C34IA Secretary, C34 #224, 1986, SR/FK, M25 engine, Rocna 10 (22#)
Stu,
Thanks for the info. Ordered the bracket today.
Chris
Chris Stewart
S/V "24~7"
1984 Catalina 36 Tall
Hull #251 M25
(SF Bay) Alameda, CA
Chris, what happened to your humorous reply post? I really got caught up in it, thought it was great!
One of the keys to your bracket replacement is the studs through the manifold. Mine were long enough, on a friend's Ericson 32 I had to remove them. PB Blaster and patience is your friend.
Good luck.
Stu Jackson, C34IA Secretary, C34 #224, 1986, SR/FK, M25 engine, Rocna 10 (22#)
[QUOTE=stu jackson c34;11503]Chris, what happened to your humorous reply post? I really got caught up in it, thought it was great!
One of the keys to your bracket replacement is the studs through the manifold. Mine were long enough, on a friend's Ericson 32 I had to remove them. PB Blaster and patience is your friend.
Good luck.[/QUOTE]
Funny I am in the middle of the same job on an Ericson 32-3 right now... Manifold had to come off. I hope I took enough pics to do a "how to" article of which there are not any, step by step.... Also doing, alt, engine harness re-wire, exhaust riser, starter, HX on and on and on.. Will be nice when it's done... At least the E-32-3 has good access...:)
-Maine Sail
https://www.marinehowto.com/
Stu,
Really, the C36 vs C34...
Glad you enjoyed the rib. I edited it this morning feeling a little guilty...
Since it worked there may be more to come...
My alternator brackets are on the way...shipped out today...
I took the boat out today on the bay. Unbelievable views... could almost see the Farallons from the west side of Alcatraz... So far the engine sounds great. I am noticing less vibration at all RPM's, especially at the lower RPM's. One thing I discovered one of the stringers the muffler bolts to had broken free from the hull. This ended up giving me a brand new vibration that could be heard throughout the boat. I used some thickened epoxy along and underneath the stringer which appears to have done the trick.
Chris
Chris
Chris Stewart
S/V "24~7"
1984 Catalina 36 Tall
Hull #251 M25
(SF Bay) Alameda, CA
Hi all. I recently replaced my exhaust on my M25XP. I started the project with black pipe, but switched to stainless, thinking that I might gain a couple more years between replacements.
I am attaching a picture of the pipe. I also went with the silicone hump hose. What a difference!
Enjoy.
Cheers, Bill
S/V Wild Wind, 1988 SR, #813,
Channel Islands Marina, CA
Bill,
The SS looks great! Nice and shiny! How long did the black iron pipe last?
Where did you find the SS pipe and what was the cost difference between the Black Iron and the SS. To help out my black iron riser with the union and weld for the injector was around $93.00 ($48 for the BI and $45 for the injector weld)...
Chris
Chris Stewart
S/V "24~7"
1984 Catalina 36 Tall
Hull #251 M25
(SF Bay) Alameda, CA
I just took on installing the retro alternator bracket yesterday. The union that I installed on my new exhaust riser worked like a gem. Rather than having to unbolt the exhaust flange on the back of the exhaust manifold and having to remove the entire exhaust riser as one complete piece all I had to do was remove the heat tape to the union, break the union connection and the exhaust manifold slipped off the engine. The hump hose, connected to the muffler, allowed me to easily move that portion of the riser out of the way making the removal a snap.
All I had to do was reverse the process to install the exhaust manifold, reattach the union and replace the heat tape. A note for the reinstall, this time I cut the tape on the engine side of the union and secured it with SS wire. I then continued the heat tape over the engine side of the union and wrapped the tape towards the hump hose side of the riser. I figured this would make it a little easier if i had to remove the exhaust riser in the future.
Now I don't know what that union is going to do after a couple of hundred hours of engine time but for now the union did the trick...
Chris Stewart
S/V "24~7"
1984 Catalina 36 Tall
Hull #251 M25
(SF Bay) Alameda, CA
Chris, I was able to find SS pipe and fittings at a large marine supplier in Port Hueneme, CA. The cost was not much more, maybe about $135. $20 for the SS welding. However, if you look at the picture, I welded too long of a cooling nipple and had to shorten it to fit beneath the wooden cover. Wrapped it all in new exhaust tape and it worked like a charm. As far as the black pipe, i'm not sure how long they last. I just changed materials (to SS)before installing the black pipe.
Good luck.
Bill
S/V Wild Wind, 1988 SR, #813,
Channel Islands Marina, CA
Chris and fellow posters, I need to confess my stupidity. I made some comments here regarding the exhaust routing on Chris's boat and a concern I had with the injector nozzle being to close to the muffler.
I had a look at my system last week and noted it was routed exactly like Chris's. When I made the comment, my memory was vividly invisioning the system on my last boat with a Yanmar engine that has the mixing elbow just aft and above the exhaust outlet about two feet from there to the muffler, I had to cobble quite an elaborate jumble of pumbing pieces to install that engine and I guess it took a larger spot in my data bank.
I appologize for my failed memory and my position regarding this installation. I guess this reinforces the need to keep each other honest on this site.
As for my failing memory, Sleep Train keeps advertising those Memory Foam Matress's, I think I am going to look into one as I can not remember jack these days.
Cepheus dream
C36 MK I # 825
MK I Tech Editor No Mas
So I did a similar rebuild in October 2013 with galvanized pipe from Lowes. I saved the flange and the rest was completely new. The problem is that now, just over a year later, the pipe has rusted through again. I am looking at another rebuild, or just buying the stainless steel one from Catalina Direct. Has anyone else had this issue of the pipe rusting so quickly?
Brett Sayers
S/V Tide Roller
Honolulu, HI
I think what is happening that a great deal of our pipe is coming from China. I had a friend that his Lowes black iron pipe job lasted 18 months. The pipe said clearly on it "Made in China" We went to a real plumbing supply house and bought good black iron. It been 5 years and no problem. The fellow at the supply house told us all sorts of horror stories about Chinese pipe. Most Large Govt. jobs call out not to use Chinese pipe.
Chuck Lennox
97 MKii Ventura Ca
Island Girl Hull #1611
Some people that I talked to said that the reason it rusted out so fast may also be because of stray current somewhere. I've also had someone recommend setting up a freshwater flushing system for the exhaust system. I'm looking into it and will post pictures as the job goes on.
Other news, I've bought the stainless riser from CD and it should be here next Thursday. Old riser rip out is done. The flange is salvageable.
Brett Sayers
S/V Tide Roller
Honolulu, HI
I think you will be good to go for many years with the SS CD pipe.
I don't see stray voltage as a problem. I think If that happening you would have other problems too.
Fresh water flush if done right can't hurt. If done wrong you can water log your engine.
I really believe your problem was the type of black pipe. My friends boat is still going strong with the USA made pipe. That's the only thing that was changed. So far his has gotten 5 times the life out his USA pipe.
Just my 2 cents.
Chuck Lennox
97 MKii Ventura Ca
Island Girl Hull #1611
Just a heads up. Any exhaust work should be done with Schedule 80 black iron. Sched 80 is actually an ABYC requirement for exhaust sytems....
"ABYC P1 - 1.6.3
Pipe Size - Threaded pipe and fittings for the engine exhaust(s) shall be at least schedule 80 pipe or the equivalent."
Galvanized pipe, in the dry section of the exhaust before the water injection point, does not last any longer and only costs more. Even in wet sections I don't find it lasts any longer...
-Maine Sail
https://www.marinehowto.com/
I do remember that we used 80 from the plumbing supply. The guy did say he thought the big box stores only sold 40. Great point!
Chuck Lennox
97 MKii Ventura Ca
Island Girl Hull #1611
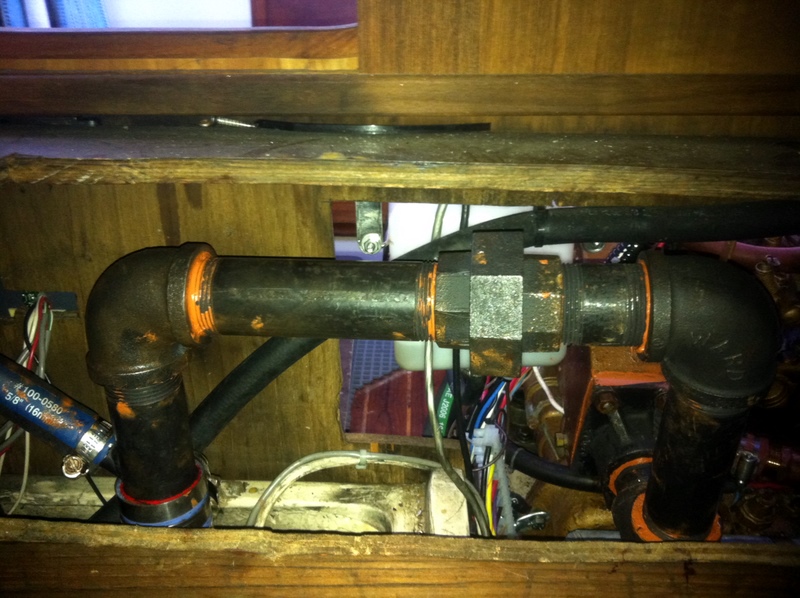
Another successful black iron exhaust riser replacement! Just wanted to share my recent upgrade to my M25. While tightening the packing gland and running in gear for a few minutes to measure drips, I noticed alot more water coming from the direction of the aqualift. Pulled off the wood "box" around the exhaust riser and noticed water dribbling all over the top of the muffler, running down the injection elbow. Pulling off the heat wrap there was the culprit- the injection elbow had rusted through and failed, cracked, right at the area where the 5/8 nipple is welded in. unwrapping the rest of the riser it became evident that this was probably all original equipment - one solid hunk of rust held together with heat wrap. Exhaust flange- unsalvageable. Injection elbow- unsalvageable. The rest of the pipe- could barely see threads. Must have been that good solid American Schedule 80 to last 30+years though.
So looking at my choices:
- CD SS riser $500
- CD exhaust heat jacket (required if you're ordering the riser from CD) $160
- new flange $90
- Injection elbow $70
- hump hose $50 at CD
Going the CD route, minimum $800. Plus they want you to ship your old riser to them for a fit-test? That could be at least another 2 weeks of downtime.
Option 2:
- Grainger schedule 80 black iron pipe: 1 street elbow, 2-90 elbows, 2 nipples $60.00
- flange $90
- Hump hose from amazon $8.00 (high performance silicone, same specs as that sold by CD)
- injection elbow $70
- 2 gaskets $6.00
- heat wrap, 50ft, amazon $25
- new 5/8 injection hose at West Marine (6 ft) $25
- misc clamps, gasket sealant, foil tape, ss nuts, etc. ~$30
- blood, sweat, tears, beers
All-in ~$300. No brainer.
See before and after pics below.
I owe a huge debt of gratitude to the Reality Check website, where I based my design, as well as all the great threads on this website.
On to the next project!
Jeff D
Island Time
'84 MK-I SR/FK #273
Kemah, TX