

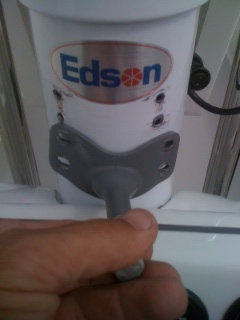
I had just finished making a tack, and was using the autopilot, when a couple of screws fell out on the cockpit floor. The screws came from the little gray Pinocchio nose looking thing that is attached to the pedestal. The nose part of it sticks in to the autopilot ring on the steering wheel.
It appears these screws are just screwed in to the thin metal of the pedestal. I went and bought some bigger screws, but feel that is is just a band aid for the original poor installation.
I think the optimum install would be with bolts, and fastening nuts. It looks like it is going to be a lot of work to open up this pedestal, to do this correctly.
Anyone else have this issue?
—
Blair White
2004 C36 MKII # 2169 "Dash"
Pacific Beach, CA
I had the same thing happen. I drilled the screw holes out to the appropriate size to tap for 1/4 inch bolts. I then tapped the holes, drilled the bracket for bolt clearence and re assembled with stainless bolts (like3/4inch), and lock washers.
I used what I seem to rember is called Lanacote or something like that, on the threads to retard corrosion as the two mating metals are not same.
No issues since doing this three years ago.
Neil Roach
"Crewless"
1992 36, Mark I
Hull # 1174
Seattle
Once again, I am going to aim you to the C36IA Technical Library. From the C36IA homepage, click on the Technical tab, then on Manuals. Look down that list of manuals to find 'Edson Engine Control Manual'. Open this PDF to see how the Edson pedestal is put together and for instructions on disassembly and adjustment.
How to get to the C36IA homepage from here...simply click on 'Catalina 36 International Association' on the blue bar, lower right corner of this page.
The C36IA Technical library is available to paid-up Members (capital M) of the C36IA. Just because someone is a member (small m) of this free Forum doesn't mean they are paid Members (capital M) of the C36IA. If anyone reading this is not a already a Member (capital M) of the C36IA, this posting gives you an example of the many great reasons to become one.
Larry Brandt
S/V High Flight #2109
Pacific Northwest, PDX-based
2002 C-36 mkII SR/FK M35B
Blair,
I think it had to do with the drill size used in the insallation. I had that exact same bracket on Julandra for about 15 years with no problems. I vaguely remember a drill bit being included in the parts bag, but I could be remembering another install. I also remember the screws fitting very tightly into the holes, and I had put a drop of some type of sealant on them when they were installed. I wouldn't fault the design. The forces on the screws are almost in shear, and shouldn't pull out if installed properly. IMHO.
Tom Sokoloski
C36/375IA Past Commodore
Noank, CT
I agree with Tom and would add that it's probably important to use a sealant on each screw to prevent corrosion of the dissimilar metals. I always put a dab of silicone or polysulfide caulk on screws/bolts prior to tightening.
Gary and Cathy Price
1997 C36 Mk II Tall Rig/Wing Keel Imagine...
Hull # 1617
Worton Creek, Md.
Northern Chesapeake Bay